• Skip to primary navigation
  • Skip to main content
  • Skip to primary sidebar

Positively Splendid {Crafts, Sewing, Recipes and Home Decor}

Handcrafted. Splendidly.

  • Home
  • Blog
  • + Handmade
    • Crafts
      • Craft Gift Ideas
      • Holiday Crafts
      • Home Decor Crafts
      • Kids’ Crafts
      • Paper Crafts
      • Quick and Easy Crafts
      • Wearable Crafts
      • Wreaths
    • Gift Ideas
      • Budget-Friendly Gifts
      • Gift Wrapping
      • Gifts for Dads and Grandpas
      • Gifts for Kids
      • Gifts for Men
      • Gifts for Moms and Grandmas
      • Gifts for Neighbors
      • Gifts for Sports Fans
      • Gifts for Teachers
      • Gifts for Women
      • Quick and Easy Gifts
    • Kid-Friendly Projects
    • Sewing
      • Sewing for Children
      • Sewing for Men
      • Sewing for the Home
      • Sewing for Women
      • Sewing Techniques
      • Sewn Accessories
      • Sewn Gifts
  • + Home & Garden
    • DIY Home Decor Projects
    • Helpful Tips
    • Home Decor Crafts
    • DIY
    • Home Tour
    • Mantels and Tablescapes
    • Organization
    • Outdoor and Garden
  • + Holidays & Seasons
    • Spring
    • St. Patrick’s Day
    • Summer
    • Teacher Appreciation
    • Thanksgiving
    • Valentine’s Day
    • Winter
    • Back to School
    • Christmas
    • Easter
    • Fall
    • Fathers’ Day
    • Graduation
    • Halloween
    • Independence Day
    • Mothers’ Day
    • New Year’s
  • + Printables
  • + Recipes
    • Soups and Stews
    • Appetizers and Salads
    • Breads
    • Desserts
    • Food Crafts
    • Main Dish

Custom Fabric Wall Decal Tutorial

January 11, 2012 By Amy @ Positively Splendid

FacebookTweetPinYummlyPrint


These custom wall decals I created with scraps of fabric from the baby bedding I sewed for George’s nursery took me a total of one hour to cut out and hang, but the personality they add to the space is huge. These give a cheery polka dot sensibility to the accent wall behind George’s crib, and they mimic the look of painted wall stenciling, but with a fraction of the work. The secret? Use spray starch to temporarily adhere fabric shapes to your walls. That’s it! For those living in rented spaces or those wanting to keep their options open to change out their decor frequently, this is the perfect wall solution. These decals will pull down from the wall easily when I am ready to change things up down the road, and the wall will be absolutely no worse for the wear!

Curious to see how I put these together? Read on!

I was first introduced to the idea of using spray starch to adhere fabric to walls by Brandy of Gluesticks in this post. I banked the idea away for future reference, and when I was staring at the blank wall behind the crib in the nursery a few weeks back, I knew exactly how to put it to good use!

For this project, you will need…
Newspaper or Kraft paper
Circle templates in various sizes
Washable ink marker
Scissors
Scotch tape
Various fabric scraps
Sewing shears
Spray starch
Plastic bin or bucket

Start by tracing your circle templates onto your newspaper or Kraft paper, and then cut each circle out. You will need to cut out a circle for each polka dot you want on your wall. This might seem like a lot of work, but trust me: it will make achieving a nice, balanced polka dot pattern so much easier! For my templates, I used serving bowls in various sizes from my kitchen.

Using your Scotch tape, adhere the circles in your preferred configuration on your wall. This might take some finagling, but arrange and rearrange the circles until you achieve a pattern you like.

(The photo above presents a very strong case for using the proper lighting in photos. Taken at night, with a flash. Yikes!)


Once you are happy with your pattern, I recommend using a pencil to label each hanging circle with the description of the fabric you want to use for it. You can refer to this as you cut out your fabric circles to ensure you don’t wind up with too many or too few of a particular pattern.

Now, set to work cutting out circles from your fabrics. Don’t remove your paper circles from your wall to do this! Instead, use the bowl or template you used to make each paper cutout to trace a circle using your washable ink marker onto your various fabrics. By doing it this way, you will simply be able to swap out your paper circles for your fabric ones later on, saving you the frustration of trying to remember exactly which size circle belongs where!

Once your circles are cut out, it’s time for the fun part of the process: adhering them to your wall! Place each circle in your plastic bin, and spray it with starch until it is completely saturated. There should be no dry spots remaining on your fabric. Hang each starched piece over the side of your bucket for a minute or so to allow any excess starch to drip off. 


Now, swap out each paper circle with its respective fabric replacement. Adhering your starched fabric is much like placing a giant sticker on your wall: simply place it facing out on your wall, and then, starting at the center, smooth out any bubbles or wrinkles. So easy! This part really goes quite quickly.


As you’re working, try to touch the outer edges of your fabric circles as little as possible, since their unfinished edges will fray with too much contact. If some fraying does occur, you can use your fingernail to smooth out the strings to conceal them along the edge of your circle. If you have any starch drips down your wall, use a damp rag to wipe them away. 

That’s all there is to it!
Your polka dot accent wall is complete.

I have been so overwhelmed by the positive feedback regarding this space. Thank you so, so very much for all of your sweet comments! The pennant valance and drape tutorial is on its way tomorrow, so I hope you’ll make plans to stop back by.

Photobucket

Linking this to…
Skip to My Lou
Home Stories A to Z

Amy @ Positively Splendid

Having grown up in a home brimming with sewing notions and paintbrushes, Amy has a deep love for all things creative. On any given day, you’ll find her knee-deep in her latest creative endeavor, with projects ranging from sewing and crafts to home decor and kid-friendly ideas. Amy believes that everyone, regardless of skill level or experience, possesses the ability to create something beautiful, and Positively Splendid was born of her passion for helping others harness their innate creative potential.

EVEN MORE GREAT IDEAS JUST FOR YOU!

FacebookTweetPinYummlyPrint

Filed Under: Crafts, Home Decor Crafts, Home Decor Crafts, Positively Home & Garden, Quick and Easy Crafts, Tutorials Tagged With: Baby, Crafts, Nursery, Positively Home & Garden, Wall Decor

Previous Post: « Valentine Doughnut Pops
Next Post: Pennant Valance and Drape Tutorial »

Reader Interactions

Comments

  1. Jessica Kielman says

    January 11, 2012 at 3:20 pm

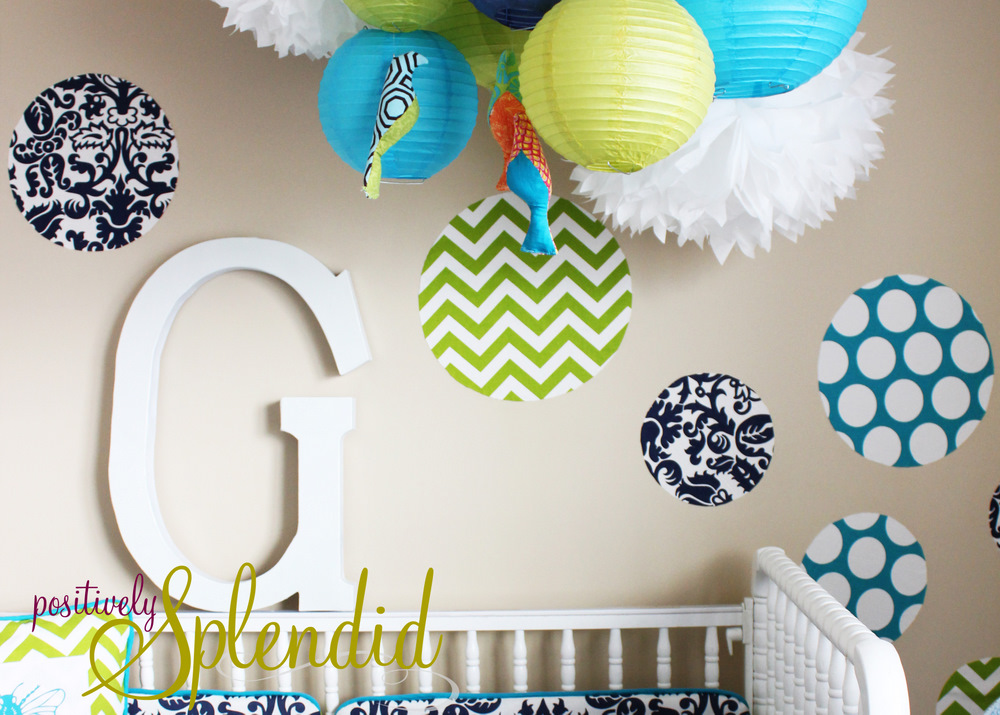
    Oh My Goodness! This is just what I have envisioned doing in Kate’s room! She has one wall with pink chalk board paint polka dots, and I wanted to mirror the same effect on another wall, but with fabric. I think I can do this with my Cricut instead of having to cut them out by hand. One question, do you think it will damage the wall when you want to remove them eventually…not really worried about the paint, just the drywall under it.

    Jessica @ Mom 4 Real

  2. Mary Beth says

    January 11, 2012 at 4:09 pm

    You are so talented….I love seeing your creations.

    Have a day full of joy and blessings!!!

    hugs, mb

  3. Laura at Ms. Smartie Pants says

    January 11, 2012 at 5:50 pm

    Amy I am thinking that is one happy baby with all those visuals. I didn’t think of spray starch when I did mine, I rolled on liquid starch. Great room!

  4. Cheeky D says

    January 11, 2012 at 7:16 pm

    So cute! What a great idea!

  5. Jennifer says

    January 11, 2012 at 7:48 pm

    LOVE this room!! Thank you so much for continuing to share!

  6. Stephanie says

    January 12, 2012 at 2:40 am

    LOVE IT! I needed something like this for my kids rooms, because we rent and painting is too much commitment.
    Thanks for posting this.

    http://threeloudkids.com

  7. SimpleThingsSweetLife says

    January 16, 2012 at 2:57 pm

    Love this idea!! I’m going to pin it on Pinterest! Blessings, Donna

  8. Sally says

    January 17, 2012 at 5:39 am

    SO cute! That is such an adorable nursery!!
    Sally
    loveofhomes.blogspot.com

  9. Ashlee says

    January 17, 2012 at 4:57 pm

    I did this in my daughter’s room! It’s great for renting since it comes right off! So cute!

  10. Jen Lossing, The Consigner Designer says

    January 18, 2012 at 2:46 am

    This is so adorable! Great way to add color without to much commitment! Great job

  11. Baked Bliss says

    January 23, 2012 at 8:34 pm

    HI! I love this idea. Do you think this would work on a painted door as well as long as the surface is smooth?

  12. Bryant Park Designs says

    January 24, 2012 at 2:01 am

    AMAZING! This is such a wonderful DIY project. Thanks for sharing!! Becky

  13. nedandgrace says

    February 8, 2012 at 6:45 pm

    This is just beautiful! I would like to do this project in my kid’s basement playroom. Where did you find the chevron and polka dot fabrics?
    I have posted to Pintrest.

  14. Vivian says

    March 22, 2012 at 4:56 pm

    Where did you get the Chinese lanterns?

  15. AuntCB says

    March 29, 2012 at 12:46 pm

    Awesome for the college dorm or apartment! Can’t wait to let her pick out her theme for the fall!

  16. AuntCB says

    March 29, 2012 at 12:47 pm

    Awesome for the college dorm or apartment! Can’t wait to let her pick out her theme for the fall!

  17. AuntCB says

    March 29, 2012 at 12:47 pm

    Awesome for the college dorm or apartment! Can’t wait to let her pick out her theme for the fall!

  18. Jessica says

    January 7, 2013 at 12:01 am

    Live this! Can these be removed and re-adhered again with more starch?

    • Amy @ Positively Splendid says

      January 8, 2013 at 10:26 am

      I couldn’t see why that wouldn’t work, Jessica. The fabric should become sticky again once the starch is applied. Thanks so much for stopping in!

Primary Sidebar

PS Search

Search this website

Seasonal Inspiration

Hocus Pocus Wreath
Ghost Plushies
Paper Pumpkins
Fabric Yo-Yo Pumpkins

Copyright © 2025 · Positively Splendid · All Rights Reserved. · Privacy Policy

Privacy & Cookies: This site uses cookies and other tracking technologies to assist with navigation and your ability to provide feedback, analyse your use of our products and services, assist with our promotional and marketing efforts, and provide content from third parties. To find out more, as well as how to remove or block these, see here: Our Cookie/Privacy Policy