• Skip to primary navigation
  • Skip to main content
  • Skip to primary sidebar

Positively Splendid {Crafts, Sewing, Recipes and Home Decor}

Handcrafted. Splendidly.

  • Home
  • Blog
  • + Handmade
    • Crafts
      • Craft Gift Ideas
      • Holiday Crafts
      • Home Decor Crafts
      • Kids’ Crafts
      • Paper Crafts
      • Quick and Easy Crafts
      • Wearable Crafts
      • Wreaths
    • Gift Ideas
      • Budget-Friendly Gifts
      • Gift Wrapping
      • Gifts for Dads and Grandpas
      • Gifts for Kids
      • Gifts for Men
      • Gifts for Moms and Grandmas
      • Gifts for Neighbors
      • Gifts for Sports Fans
      • Gifts for Teachers
      • Gifts for Women
      • Quick and Easy Gifts
    • Kid-Friendly Projects
    • Sewing
      • Sewing for Children
      • Sewing for Men
      • Sewing for the Home
      • Sewing for Women
      • Sewing Techniques
      • Sewn Accessories
      • Sewn Gifts
  • + Home & Garden
    • DIY Home Decor Projects
    • Helpful Tips
    • Home Decor Crafts
    • DIY
    • Home Tour
    • Mantels and Tablescapes
    • Organization
    • Outdoor and Garden
  • + Holidays & Seasons
    • Spring
    • St. Patrick’s Day
    • Summer
    • Teacher Appreciation
    • Thanksgiving
    • Valentine’s Day
    • Winter
    • Back to School
    • Christmas
    • Easter
    • Fall
    • Fathers’ Day
    • Graduation
    • Halloween
    • Independence Day
    • Mothers’ Day
    • New Year’s
  • + Printables
  • + Recipes
    • Soups and Stews
    • Appetizers and Salads
    • Breads
    • Desserts
    • Food Crafts
    • Main Dish

Pennant Valance and Drape Tutorial

January 12, 2012 By Amy @ Positively Splendid

FacebookTweetPinYummlyPrint

Throughout this week, I’ve been sharing the fabric projects I completed for my new son’s nursery, starting with the crib bedding, then moving on to the custom fabric wall decals I used on the accent wall behind his crib. Now, let’s move on to today’s promised project tutorial for how I created the pennant valance and matching drapes!

Pennant Valance

For this project, you will need…

  • Kraft paper, to make your pattern
  • Clear ruler
  • Background fabric for the front of your pennants (I used white twill)
  • Assorted accent fabrics
  • Drapery interlining (Much like a lightweight flannel, found in the home dec section of your fabric store.)
  • Fabric for the back of your pennants (I used a charcoal grey twill.)
  • Large grommets and grommet tool (Depending upon the size of your window, you will probably need two packages of grommets for this project. You will need two grommets per pennant.)
  • Washable ink marker
  • Coordinating thread
  • Pinking shears
  • Ribbon
  • Basic sewing supplies: machine, shears, etc.


Draft a pattern for the main body of your pennants. To begin, draw a line on your Kraft paper that is 7 inches long. Make a mark at the midpoint of this line. Now, starting at that center mark, use your clear ruler to draw another line that is 13 inches long perpendicular to the 7-inch line. Using your ruler, draw a line to connect the left and right edges of your 7-inch line with the end of your 13-inch line. (Refer to the diagram below.) Voila! A pennant template. Cut this template out.

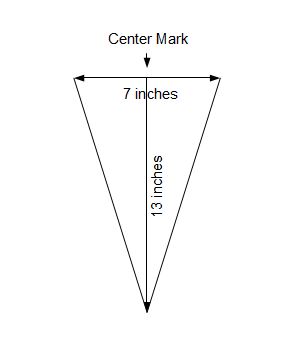
Now, you will make another template for the center accent triangles on your pennants using the same method from above, except for this smaller template, your short line will be 5 inches and your long line will be 10 inches. Make sense? Cut this template out, as well.

Measure your window to determine how many individual pennants you will need. Each finished pennant will be about 6.5 inches wide. For my 71-inch window, I made 11 pennants. Using the main body template you created earlier, cut out your fabrics that will comprise the main body of each pennant panel. Each individual pennant is made up of three layers:

Top: Front Background Fabric
Middle: Drapery Interlining
Bottom: Backing Fabric

So, for each pennant you will cut a triangle using your main body template from the fabrics for each of those layers.

Now, use your smaller template to cut out a triangle from your accent fabric(s) for each pennant using pinking shears.

At this point, I recommend placing your cut triangles in stacks to keep all of the pieces for each respective pennant together. It makes the assembly process much easier!

Take one of your front background fabric triangles, and place it face up on your work surface. Center one of your smaller accent triangles face up on top of this piece, so that the top edges of each piece are aligned. Pin. Edgestitch along the long edges of the accent triangle to affix it to the background triangle.

Place your backing fabric triangle face down on your work surface. Place your drapery interlining piece on top of this piece, carefully aligning all of the edges. Now, place the front triangle piece you just stitched face up on top of your drapery interlining piece. You’ve just made a fabric sandwich! 🙂 Pin all of your layers together and stitch them together around all three sides using a 1/4-inch seam. Use your pinking shears to trim all the way around your pennant piece as closely as possible to your stitching without cutting any of the threads. 

Repeat the above process until your have completed all of your pennant pieces. This part really goes quite quickly!

Once all of your pennants are stitched, it’s time to set your grommets. You will need to set a grommet at each top corner of your pennant pieces so that you can connect them with ribbon later on.

To do this, place your grommet on top of your pennant as desired, and trace around the center with a washable ink marker. Use very sharp scissors to carefully trim away the center of this circle, making sure to cut through all three layers of fabric.

Now, insert the front grommet piece (the one with the long post at the center) through this hole, working from the front of your pennant piece to the back, so that you can see the post of the piece sticking out of the back of the pennant. Place the grommet back over the center post, and then fit the anvil piece (this is provided with the grommet-setting kit) on top. Use a hammer to give about 3 even whacks on top of the anvil to secure the grommet in place. Repeat until you have set two grommets in each pennant piece. 

Arrange your pennants on the floor in the order you want them to hang, and thread ribbon through the grommets to tie your adjoining pieces together, as shown. I tied my pennants together in two different sets.


Your valance is complete! Now, let’s get started on the drapes.

Drapery Panels

So here’s the skinny: I cheated here a little bit. See those white drapery panels? I found them for less than $20 (for both!) at Walmart, and then I gussied them up with fabric to match the crib bedding. This is such a great technique to use for any room in your home! Sewing drapes can become a shockingly expensive endeavor when you calculate how much fabric each panel requires, so sometimes the money and time saved by customizing premade products is just what the doctor ordered!

For this project, you will need…

  • Store-bought drapery panels
  • Assorted coordinating fabrics
  • Coordinating thread
  • Basic sewing supplies: machine, shears, etc. 
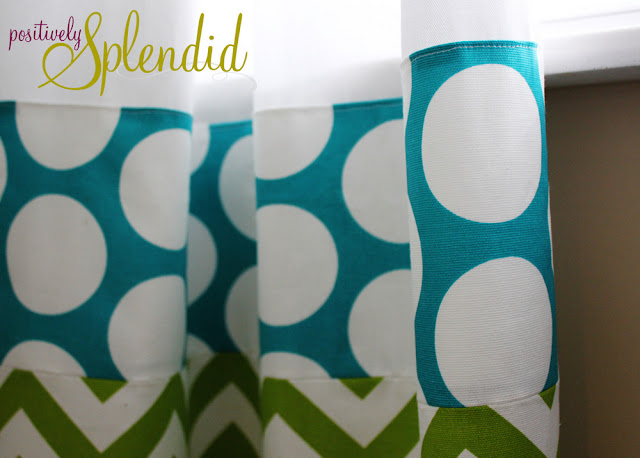
Each of my drapery panels were 39.5 inches wide. I knew I wanted my accent fabrics to extend 22.5 inches up from the bottom of each panel, so I cut my fabrics to the following dimensions:

  •  Upper Accent Piece: 40 x 6.5 inches (40 = Width of panel + .5 for seam allowances and 6.5 was a number I chose to provide enough width to adequately see the polka dot pattern)
  • Lower Accent Piece: 40 x 16.5 (40 = Width of panel + .5 for seam allowances and 16.5 = 22.5 [length of accent panel] – 6.5 [length of upper accent piece]+ .5 for seam allowances)
After the calculating and cutting this couldn’t be simpler! Place your upper accent piece and lower accent pieces together, right sides facing, so that the lower edge of the upper accent piece is aligned with the top edge of the lower accent piece. Stitch together using a 1/4-inch seam. Press your seam open. Now, press all of the outer edges of your completed panel under 1/4 inch.

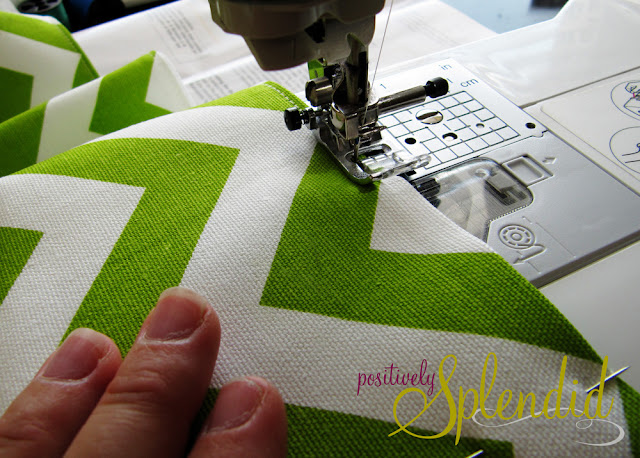
 Place your accent panel face up on top of your drapery panel, carefully aligning the bottom corners of each piece. Pin into place and edgestitch all the way around your accent panel to secure it to your drapery panel. All done!

To hang your creations, I recommend installing a double curtain rod set. Use the ribbons at the end of your pennant sets to tie them to your front rod, and hang the completed drapery panels from the back rod.
In my opinion, there are few things that impact the look of a space more than window treatments. I just love how these turned out: just the whimsical, sweet feel I was after!

Thanks for sticking with me this week throughout this nursery extravaganza! I have been so excited to share these projects with you, and I have been absolutely thrilled at the amazing feedback I’ve received regarding this space. Truly, your comments and kind words are such a blessing to me! Thank you!

Photobucket

Amy @ Positively Splendid

Having grown up in a home brimming with sewing notions and paintbrushes, Amy has a deep love for all things creative. On any given day, you’ll find her knee-deep in her latest creative endeavor, with projects ranging from sewing and crafts to home decor and kid-friendly ideas. Amy believes that everyone, regardless of skill level or experience, possesses the ability to create something beautiful, and Positively Splendid was born of her passion for helping others harness their innate creative potential.

EVEN MORE GREAT IDEAS JUST FOR YOU!

FacebookTweetPinYummlyPrint

Filed Under: Home Decor Crafts, Positively Home & Garden, Sewing, Sewing for the Home, Tutorials Tagged With: Baby, Nursery, Sewing, Window Treatments

Previous Post: « Custom Fabric Wall Decal Tutorial
Next Post: Cutting Edge Stencils Giveaway!! »

Reader Interactions

Comments

  1. Our really empty nest says

    January 12, 2012 at 2:01 pm

    Love this, wish I had a little one to decorate for, mine are long grown!! Thanks for sharing! Sue

    • Amy @ Positively Splendid says

      January 12, 2012 at 10:32 pm

      Thanks so much, Sue! I so enjoy putting together spaces for little ones!

  2. Michele {The Scrap Shoppe} says

    January 12, 2012 at 2:50 pm

    Just too cute, Amy! The bunting is adorable. And I love the pop of color at the bottom of the curtains! You did an amazing job pulling the entire room together. 🙂

    • Amy @ Positively Splendid says

      January 12, 2012 at 10:33 pm

      Thanks so much, Michele! This is now my favorite room in the house. 🙂

  3. Michaela @ coveredinmodpodge.blogspot.com says

    January 12, 2012 at 8:21 pm

    I love your pins! I feel like I’d be happier sewing with pins like those!

    I’m considering adding black out curtains to my daughter’s nursery. I love how you added your own fabric to store bought curtains. It’s wonderful inspiration for my own space!

    • Amy @ Positively Splendid says

      January 12, 2012 at 10:33 pm

      The pins were a gift from my mom. They do make sewing much more fun! 🙂

  4. Kara @ Mine for the Making says

    January 12, 2012 at 10:31 pm

    GORGEOUS!!! Great tutorial too!

    • Amy @ Positively Splendid says

      January 12, 2012 at 10:34 pm

      Thanks so much, Kara!

  5. Stefi says

    January 13, 2012 at 8:08 pm

    You have done an incredible job!

  6. Celeste says

    January 18, 2012 at 3:01 pm

    You have done a great job. Hoping to do something like this for when my grandbabies come along.

  7. Miller Family says

    January 19, 2012 at 7:06 am

    I love the fabric you used! Where did you find it?

  8. CTBaker in the Acres says

    February 3, 2012 at 12:26 am

    Will you post pics of the rest of the room? 😉 I love your colors. I was thinking of using them in my youngest’s big boy room.
    Love it!!!

  9. Jennifer says

    May 21, 2012 at 5:42 pm

    I love the Pennant Valance! I want to make one for my daughter’s “big girl” room – is there are reason you used the drapery interlining? Does it just make it stiffer? Could you just use any kind of interfacing to serve that purpose? Thank you.

  10. bell0519 says

    May 24, 2012 at 11:47 pm

    Can you please share the size of grommets you used? I have finished the curtains, and bed skirt! Thanks for your adorable ideas!!!

  11. bell0519 says

    May 24, 2012 at 11:47 pm

    Can you please share the size of grommets you used? I have finished the curtains, and bed skirt! Thanks for your adorable ideas!!!

  12. susan says

    August 13, 2013 at 3:06 pm

    I will have to remember to add custom fabric to the store bought drapes for sure also, I’d love to know what paint color you used on the grey bookshelf.

    • Amy @ Positively Splendid says

      August 28, 2013 at 8:19 pm

      Hi, Susan! The color is San Antonio Gray from Benjamin Moore.

  13. Susy says

    November 14, 2013 at 2:39 pm

    I love your nursery, I am making the pennant valance. What size were the grommets that you used? The grommets that I purchased are 7/16″ and look a bit large.

    • Amy @ Positively Splendid says

      November 18, 2013 at 2:19 pm

      Hi, Susy! 7/16″ are the same size I used.

Primary Sidebar

PS Search

Search this website

Seasonal Inspiration

Hocus Pocus Wreath
Ghost Plushies
Paper Pumpkins
Fabric Yo-Yo Pumpkins

Copyright © 2023 · Positively Splendid · All Rights Reserved. · Privacy Policy

Privacy & Cookies: This site uses cookies and other tracking technologies to assist with navigation and your ability to provide feedback, analyse your use of our products and services, assist with our promotional and marketing efforts, and provide content from third parties. To find out more, as well as how to remove or block these, see here: Our Cookie/Privacy Policy