• Skip to primary navigation
  • Skip to main content
  • Skip to primary sidebar

Positively Splendid {Crafts, Sewing, Recipes and Home Decor}

Handcrafted. Splendidly.

  • Home
  • Blog
  • + Handmade
    • Crafts
      • Craft Gift Ideas
      • Holiday Crafts
      • Home Decor Crafts
      • Kids’ Crafts
      • Paper Crafts
      • Quick and Easy Crafts
      • Wearable Crafts
      • Wreaths
    • Gift Ideas
      • Budget-Friendly Gifts
      • Gift Wrapping
      • Gifts for Dads and Grandpas
      • Gifts for Kids
      • Gifts for Men
      • Gifts for Moms and Grandmas
      • Gifts for Neighbors
      • Gifts for Sports Fans
      • Gifts for Teachers
      • Gifts for Women
      • Quick and Easy Gifts
    • Kid-Friendly Projects
    • Sewing
      • Sewing for Children
      • Sewing for Men
      • Sewing for the Home
      • Sewing for Women
      • Sewing Techniques
      • Sewn Accessories
      • Sewn Gifts
  • + Home & Garden
    • DIY Home Decor Projects
    • Helpful Tips
    • Home Decor Crafts
    • DIY
    • Home Tour
    • Mantels and Tablescapes
    • Organization
    • Outdoor and Garden
  • + Holidays & Seasons
    • Spring
    • St. Patrick’s Day
    • Summer
    • Teacher Appreciation
    • Thanksgiving
    • Valentine’s Day
    • Winter
    • Back to School
    • Christmas
    • Easter
    • Fall
    • Fathers’ Day
    • Graduation
    • Halloween
    • Independence Day
    • Mothers’ Day
    • New Year’s
  • + Printables
  • + Recipes
    • Soups and Stews
    • Appetizers and Salads
    • Breads
    • Desserts
    • Food Crafts
    • Main Dish

DIY Framed Chalkboard Tutorial

December 29, 2011 By Amy @ Positively Splendid

FacebookTweetPinYummlyPrint


Do you ever get a project in your head that just won’t let you rest until you get it done? When I first stumbled upon this sweet nursery decor at Spearmint Baby (which I referenced in my Chalkboard Birth Announcement post earlier this week), that is exactly how I felt. 

I knew I wanted a board like that in George’s nursery, but with a budget so tight it almost squeaked, I really couldn’t justify breaking the bank to buy one. I knew I could either doctor up an old painting like I did for the chalkboard in my kitchen, or I could set to work making a chalkboard from scratch. Being too impatient to hunt down a thrift store painting, I opted for the latter option. 

This really is a super simple project. We’re talking a total of 30 minutes of active time (plus drying time). 
Here’s what you need:

(1) 2-foot square piece of precut birch (my piece was about $8 at Lowe’s)
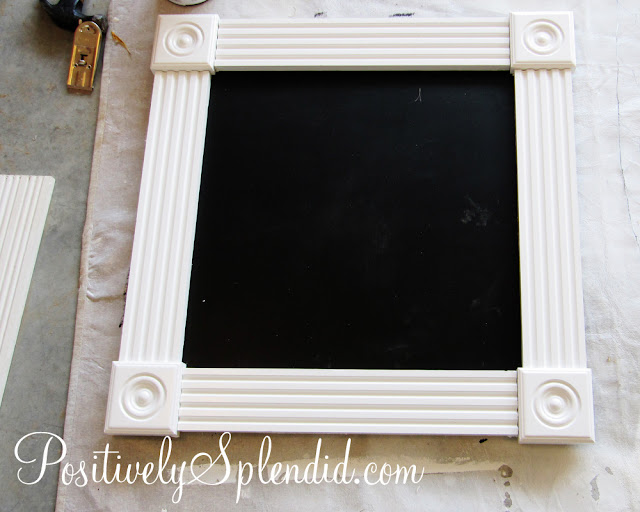
Decorative trim (Mine was 3 inches wide with four grooves in the middle)
(4) 3.5-inch square decorative corner blocks
Primer
Chalkboard paint
Paint for your trim
Construction adhesive (I used Liquid Nails)
D-ring hangers

Note: I used birch because it was my smoothest option, and smooth is a must when creating a chalkboard surface. Birch is more expensive than, say, typical plywood, so if you’re wanting to minimize costs, you can purchase a less expensive type of wood and do some sanding. I was hugely pregnant when I tackled this project, so I opted to take the easy way out. 🙂

First things first: Have the lovely folks at your home improvement store cut your trim down for you. You’ll need four pieces that are each 17 inches long.

Apply a coat of primer to your square piece, and also to your trim and corner pieces if you aren’t using the pre-primed variety. Allow to dry completely.

Apply a few coats of chalkboard paint to your square piece, allowing each coat to dry before adding another.   I found three coats to be just right. Paint your trim pieces in your desired color, and allow to dry completely.


Once all of your paint is dry, assemble your board. You’ll have a square block at each corner with the straight trim pieces connecting them along of the outer edges. To maximize the size of your chalkboard writing area, place your trim pieces so they hang over the edge of your birch piece by a half inch or so all the way around. I found it easiest to lay all of my trim pieces on top of my chalkboard piece just like I wanted them before starting to glue everything into place with my Liquid Nails. Make sure all of your pieces are butted up closely to one another as you glue, minimizing the gaps between them as much as possible. (I found it unnecessary to use any caulking to fill in gaps between the trim pieces once I was done adhering them, but if you have any gaping spaces that need attention, that will do the trick.)


Now, affix your D-ring hangers to the back of your board. That’s all she wrote!

I love that this will be a dynamic piece of artwork that can be changed with seasons or events. What a fun concept for a baby or child’s room! Of course, if you don’t have little ones to decorate for, this would be a great decor option for a kitchen, home office, or mantel, too!


Thanks so much for stopping in!

Photobucket

Amy @ Positively Splendid

Having grown up in a home brimming with sewing notions and paintbrushes, Amy has a deep love for all things creative. On any given day, you’ll find her knee-deep in her latest creative endeavor, with projects ranging from sewing and crafts to home decor and kid-friendly ideas. Amy believes that everyone, regardless of skill level or experience, possesses the ability to create something beautiful, and Positively Splendid was born of her passion for helping others harness their innate creative potential.

EVEN MORE GREAT IDEAS JUST FOR YOU!

FacebookTweetPinYummlyPrint

Filed Under: Crafts, DIY, Positively Home & Garden, Tutorials Tagged With: Baby, Nursery, Wall Decor

Previous Post: « Top Eleven in 2011
Next Post: How to Make a Pom Pom Baby Mobile {Tutorial} »

Reader Interactions

Comments

  1. CLM-cindylu2u says

    December 29, 2011 at 3:04 pm

    I love this project Amy, it is a must do!! thanks

  2. Ruby Jean says

    December 29, 2011 at 5:27 pm

    I LOVE chalkboard paint… And this project looks like a FUN one.. 🙂

  3. Michelle says

    December 29, 2011 at 9:12 pm

    I really like this project and I love the trim you have used it reminds me of Greek or Roman Pillars. It’s a very sweet addition to the nursery, but you are right I could imagine it my craft room or kitchen. Thanks for sharing the tutorial you make it look easy 🙂

  4. sarah jane says

    December 29, 2011 at 11:01 pm

    Lovely tutorial, I love how classy the chalk board looks, thank you for sharing.

  5. Simply AJ says

    December 31, 2011 at 3:59 pm

    Amy, it turned out perfect! What a clever way to turn a simple chalkboard into such a work of art. Thanks for taking the time to give such a detailed tutorial. I added this to my 2012 project list – have the perfect place for one in my kitchen! Happy New Year!! AJ@queenofmynest

  6. Ashley says

    January 11, 2012 at 5:13 pm

    Love the chalkboard! Very classy touch. I’m also loving the colorful garland hanging below and the adorable wooden blocks. Care to share about those?

  7. Ayu Maselli says

    January 24, 2012 at 2:28 pm

    I just found your blog.. awesome.. i like this project thanks for sharing Amy.

    AYu

  8. Shannon says

    January 25, 2012 at 8:02 pm

    LOVE your Chalkboard!! And I super love the rosette banner on the shelf below. Are there lights in it? Do you have a tutorial/post for that banner? 🙂

Primary Sidebar

PS Search

Search this website

Seasonal Inspiration

Hocus Pocus Wreath
Ghost Plushies
Paper Pumpkins
Fabric Yo-Yo Pumpkins

Copyright © 2025 · Positively Splendid · All Rights Reserved. · Privacy Policy

Privacy & Cookies: This site uses cookies and other tracking technologies to assist with navigation and your ability to provide feedback, analyse your use of our products and services, assist with our promotional and marketing efforts, and provide content from third parties. To find out more, as well as how to remove or block these, see here: Our Cookie/Privacy Policy