When it comes to holiday gift-giving, I really strive to make the presentation of the gift as special as the contents inside. Today’s idea for quick-and-easy drawstring gift bags will enable you to add extra panache to your holiday gift-wrapping, and because they are made of fabric, they can be passed along from recipient to recipient for many holidays to come. These fabric gift bags come together with just a few minutes’ time and a small scrap of fabric and other basic supplies. Let me show you how!

For this project, you will need…
- Fabric scraps (refer below for the dimensions needed for each size)
- Coordinating thread
- Ribbon
- Disappearing ink marker
- Basic sewing supplies: sewing machine, shears, etc.
- Decorative brooch or pendant, for embellishing your bag (I used a pendant from Styled by Tori Spelling)
- Optional, but recommended: rotary cutter and mat
To begin, cut your fabric and ribbon to the following dimensions:
- For a small (approximately 7-inch) bag: one fabric piece cut to 6×20″; one ribbon piece cut to 22″
- For a medium (approximately 9-inch) bag: one fabric piece cut to 8×24″; one ribbon piece cut to 24″
- For a large (approximately 11-inch) bag: one fabric piece cut to 10×30″ ; one ribbon piece cut to 26″
Fold your fabric piece in half width-wise, aligning each of the short ends. Pin. Measure 5 inches from the unfolded short edge down one of the long sides, and mark with a disappearing ink marker.


Using a 1/4″ seam allowance, stitch from the mark you made in the previous step down to the folded edge of the piece. Stitch the entire length of the opposite long side. Finish the seams with a serger or a zig-zag stitch. Make a 1/4″ snip just above the point where your short line of stitching ends. (This should be right at the mark you made earlier.)

Fold down the fabric above the snip 1/4″; press. Flip the bag over and repeat on the opposite side.

Fold the top edge of the bag down 1/4″; press.

Fold the top edge of the bag (the edge you just pressed) down 2.25″ toward the inside of the bag; pin into place.

Note: The resulting cuff will measure 2.25″, and it should be precisely aligned with the snip you made in the previous step.

Stitch 1/8″ from the lower folded edge to secure.

Using your disappearing ink marker, mark 3/4″ from the line of stitching you just made.

Stitch along these marks to form the casing through which you’ll feed the ribbon drawstring for your bag.

Now, feed your ribbon piece through the casing with a bodkin (or a safety pin).

You are finished!
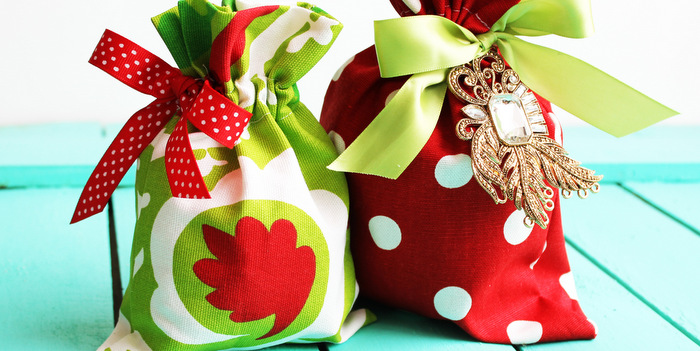
Fill your bags with any gift item that strikes your fancy: jewelry items, edible treats, and more!


To really make the polka-dotted bag shine, I slid a pretty pendant from Styled by Tori Spelling onto the ribbon before tying the bow. I plan to tuck a necklace bottom, connecting pieces, and some other coordinating pieces from the line into the bag for a marvelous, unique gift for any of of the ladies on my list!

Thanks so much for making PS a part of your day!
This is a compensated post written by me on behalf of Styled by Tori Spelling and Darice. Rest assured that all opinions expressed here are entirely my own, and I am dedicated to sharing products I feel my readers will benefit from and enjoy.
Having grown up in a home brimming with sewing notions and paintbrushes, Amy has a deep love for all things creative. On any given day, you’ll find her knee-deep in her latest creative endeavor, with projects ranging from sewing and crafts to home decor and kid-friendly ideas. Amy believes that everyone, regardless of skill level or experience, possesses the ability to create something beautiful, and Positively Splendid was born of her passion for helping others harness their innate creative potential.
These are so beautiful, Amy!
<3 Christina at I Gotta Create!
Thanks so much, Christina!
So cute! I’ve got some extra Christmas Fabric that now I know how I’m going to use!!!
Terrific, Erica! Enjoy. 🙂
What a great idea for teacher gifts. I hate spending $$$$ on packaging who purpose is to be pitched. And what is a bodkin?
I agree. I love making something that can be used a number of times. Gift bags are pricey! A bodkin is a tool used to feed things through casings: http://www.createforless.com/Dritz+Bodkin+Ezy-Pull+3+1/4/pid13120.aspx
Lovely fabrics Amy! What a simple but fun idea to dress up a gift. 🙂
xoxo
Thanks so much, Amy!
I wish I knew how to sew…these are so adorable!!! The brooch adds just that special touch to it. 🙂
Thanks so much, Crystal! If you are ever wanting to learn to sew, this would be a great beginner project for you. 🙂
So cute!!! Love the fabrics! Thanks so much for sharing the great tutorial!
Happy week !
Hugs from Portugal,
Ana Love Craft
http://www.lovecraft2012.blogspot.com
Thanks so much, Ana!
These are absolutely adorable. Thanks for sharing with us!!
These are beautiful. Excellent tutorial.
Great tutorial! I’m a fan of anything sparkly, so I love this project. 🙂
These are super sweet Amy!! I love the little fabric bags and the sparkle really finishes them off!!
I found this tutorial through Pinterest, and I am just delighted. You explained this perfectly, and I’ve already made two bags. Thank you for the effort you put into this. I will need to find a way to keep up with your feed – looks like there is a lot of great stuff here.
Dorie, I am so pleased you have enjoyed this tutorial so far! Thank you so much for leaving such a gracious comment. I hope you’ll stop in again soon!
These are so cute, why am I just now seeing them. Going to try and make a few. Great tutorial!
Thanks, Missy! I hope you enjoy making them.
I love those bags! It makes me want to throw a party just so I have a good excuse to make them! : )
Prettiest gift bag I’ve ever seen. I love it with the big ribbon and a hanging charm 🙂 Thanks a lot for sharing the tutorial!
You are so welcome! Thank you very much for the gracious comment!
Hey friend! Just found your blog through Pinterest and rather than just grabbing this tutorial and leaving I am most definitely sticking around and going to follow your blog! It’s absolutely perfect and wonderful.
XO/Lena @ Root&Blossom