You might remember my Refashioned Tee Bolero project from the last round in the Embellished Five challenge. The concept of the series is this: five different sewists are each given the same item to refashion according to their tastes, and then we all share our creations. I love how this project has prompted me to think outside the box and really push myself creatively when it comes to sewing. It has been a ton of fun!
I am in great company in this project…
Stefi from Just Chic
Jennifer from My Two Butterflies
Sarah from Sweet Pea and JoJo
and
Larissa from Just Another Day in Paradise
(I hope you’ll venture over to their places to see their creations, too!)
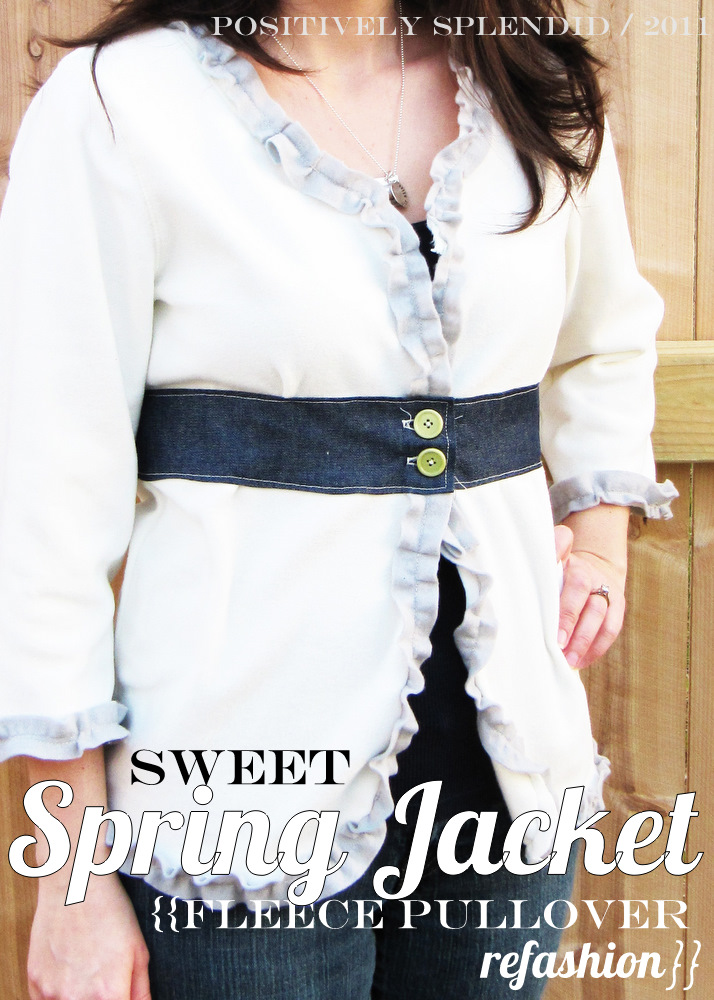
For this round, the item to be gussied up was a simple Old Navy white fleece pullover. I opted to make it into a fun little cropped-sleeve jacket that I can wear throughout the spring season! Curious to see how I did it? I can’t wait to share!
For this project, you will need:
One fleece pullover
(Note: it is important you use only fleece so your edges don’t fray later on)
Washable ink pen
Wool felt
Buttons
Coordinating fabric (I used some denim from my stash)
Coordinating thread
Basic sewing supplies: machine, shears, etc.
Optional (but recommended): rotary cutter and mat
step 1 / Use a ruler to precisely mark a line on the front of your pullover from the center of the collar to the center of the bottom edge. Carefully trim along this line, making sure to only cut through the front of your pullover. Try on your pullover, and decide how much you want you sleeves to be cropped. (I am a shorty, so mine needed to be shortened by 7 inches.) Trim off your desired amount from each sleeve.

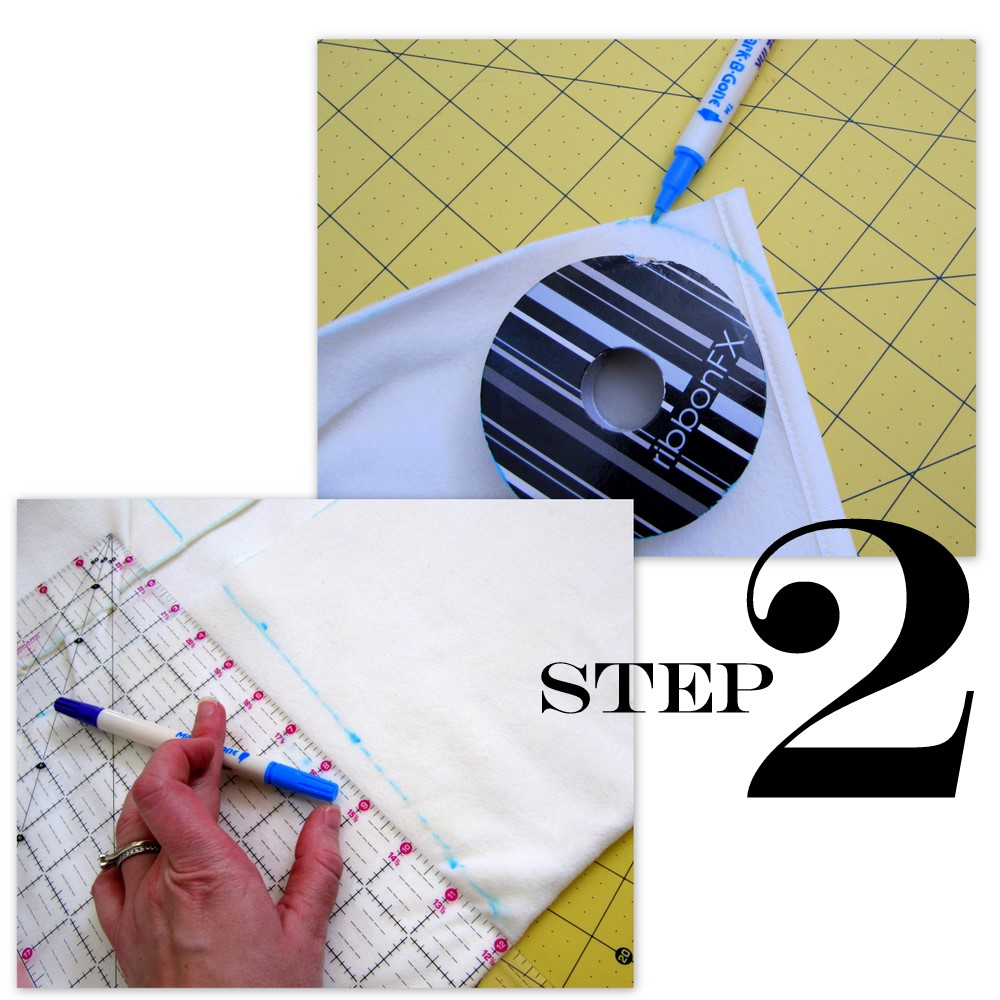
step 2 / Round off the squared corners adjoining the center line you trimmed down the front of your pullover in step one (I used a spool of ribbon as my template), and trim off the excess. (You will have four corners where you will do this: at the center of the collar where both sides of your jacket meet, and also at the bottom center of your jacket where both sides meet.) Now, try your jacket on again, and make a mark with a washable ink pen right at the most narrow point of your ribcage. Take off your jacket, and use a ruler to see exactly how far this mark is from the bottom of your jacket. Using that measurement as you guide, make a series of marks precisely on the same line with the first mark you made, all the way around your jacket. Using a ruler, connect all of these marks with a line, as shown.
step 3 / Sew a line of gathering stitches directly over the line you made in step 2, breaking at each of the side seams. Sew another line of gathering stitches 1/4″ below the first line, breaking at the seams as you did before. Gently gather each of the front side panels and the back panel of your jacket along these gathering stitches. Try on your jacket, and adjust your gathering as needed so the fit isn’t overly tight. Tie off your gathering strings when you are satisfied with the fit. **Important: The front panels need to overlap by one inch once you are done gathering.


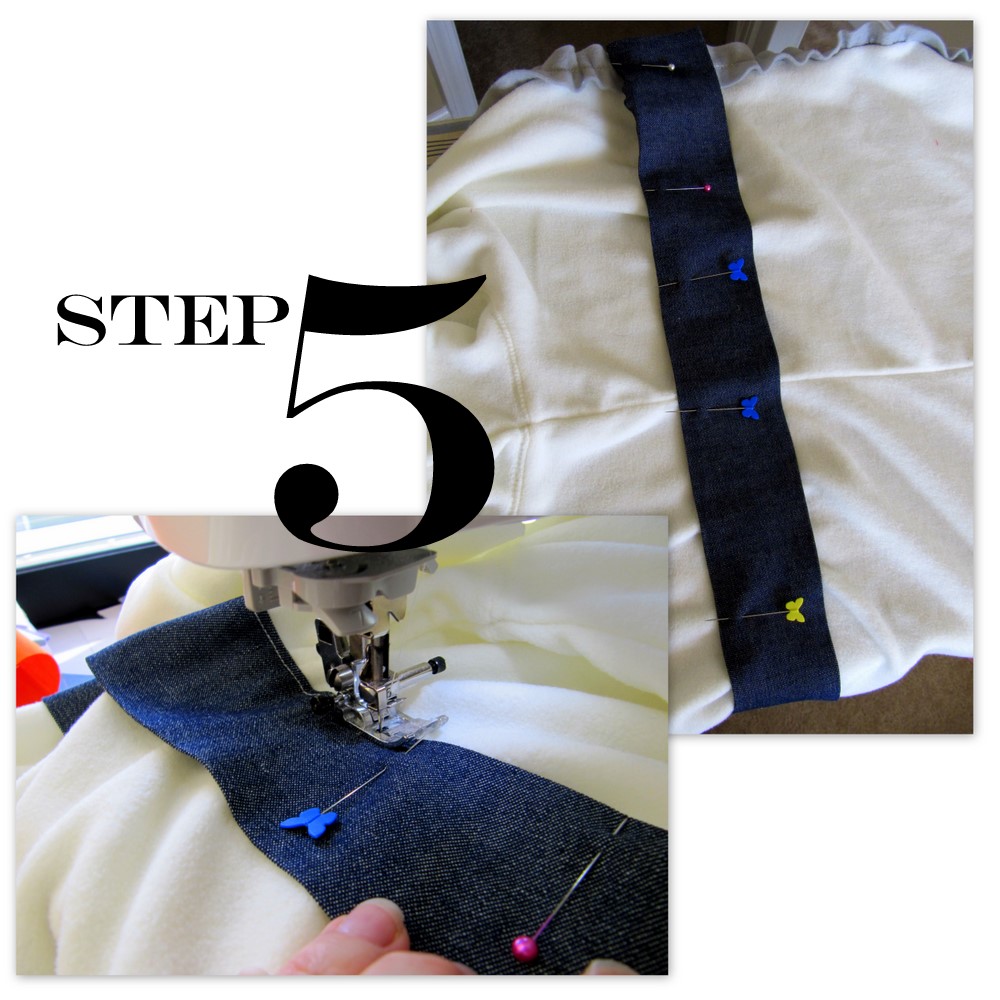
step 5 / Measure all the way around your jacket along your gathering stitches, and then cut a strip of fabric that is 3″ wide and a few inches longer than that measurement. Press one short end and both long ends of this strip 1/4″. Starting at one side of the center front of your jacket, pin this piece onto your jacket so that both rows of gathering stitching are totally concealed by the belt. When you get to the opposite center front side of your jacket, trim the short end of your strip so it overlaps the edge by 1/4″. Fold this trimmed edge under, and pin it to your jacket so it is precisely aligned with the edge. Edgestitch this belt piece to your jacket. Now, make two button holes within this belt section, and sew on your buttons.
All finished!
I love how this little jacket will be just as great with a pair of jeans as it will be dressed up with a skirt or a pair of slacks!


Having grown up in a home brimming with sewing notions and paintbrushes, Amy has a deep love for all things creative. On any given day, you’ll find her knee-deep in her latest creative endeavor, with projects ranging from sewing and crafts to home decor and kid-friendly ideas. Amy believes that everyone, regardless of skill level or experience, possesses the ability to create something beautiful, and Positively Splendid was born of her passion for helping others harness their innate creative potential.
Ilove how it came out! I wish I could sew.
Danielle
See, that is how I wanted mine to turn out. LOVE yours.
Just Another Day in Paradise
Looks great!!! I love the little belt idea that you and Larissa did. I’m just in awe of everyone’s talent. And how we all manage to do something totally different!
Very cute! I love the flattering style of this–adding it to my project list… 🙂
Love it! If I weren’t 9 months pregnant I’d be seriously trying to make myself one. 🙂
Of course, if I weren’t 9 months pregnant, I wouldn’t have time.
I can’t believe that is made out of a fleece pullover! Wow! Great job…I need to learn how to sew!
What an adorable refashion! Love those ruffles. 🙂
I really love this with the belt and the ruffles! I wanted to do something like this with mine but it didn’t fit across my chest! I might get another one in a bigger size and try your tutorial!
What a great make over! I love it. I am bookmarking this idea for sure.
http://www.itsybitsypaperblog.com
Cute idea. I came to your site from Made by You Monday. I loved looking around.
WOW – what an awesome upcycle! Thanks so much for the tutorial!
love it! thanks for the link. Didn’t I feature you? I thought I did.
Love it! Nice blog, too! I’m visiting from Sugar Bee. What a fantastic tutorial!
You are so so talented! That is beautiful!
That turned out really cute! What a good idea.
–Jill
jillmadeit.blogspot.com
Sooooo pretty!
LOVE this! So so cute and looks like it would be so comfortable. I would have never guessed this was a fleece pull over originally. Going to have to keep an eye out for these clearanced at Old Navy!
-Amy
Blog Giveaway -Ends 3/31
That’s really cute!! I love your design with the blue “belted” middle. Gives it the perfect touch.
Thanks for linking up to Take-A-Look Tuesday over at Sugar Bee Crafts – I featured you today! – Mandy, http://www.SugarBeeCrafts.com
Super cute!
Great Idea & Awesome Job! I’m going to my closet right now…..
That is beautiful!
Thanks so much, Juanis!