• Skip to primary navigation
  • Skip to main content
  • Skip to primary sidebar

Positively Splendid {Crafts, Sewing, Recipes and Home Decor}

Handcrafted. Splendidly.

  • Home
  • Blog
  • + Handmade
    • Crafts
      • Craft Gift Ideas
      • Holiday Crafts
      • Home Decor Crafts
      • Kids’ Crafts
      • Paper Crafts
      • Quick and Easy Crafts
      • Wearable Crafts
      • Wreaths
    • Gift Ideas
      • Budget-Friendly Gifts
      • Gift Wrapping
      • Gifts for Dads and Grandpas
      • Gifts for Kids
      • Gifts for Men
      • Gifts for Moms and Grandmas
      • Gifts for Neighbors
      • Gifts for Sports Fans
      • Gifts for Teachers
      • Gifts for Women
      • Quick and Easy Gifts
    • Kid-Friendly Projects
    • Sewing
      • Sewing for Children
      • Sewing for Men
      • Sewing for the Home
      • Sewing for Women
      • Sewing Techniques
      • Sewn Accessories
      • Sewn Gifts
  • + Home & Garden
    • DIY Home Decor Projects
    • Helpful Tips
    • Home Decor Crafts
    • DIY
    • Home Tour
    • Mantels and Tablescapes
    • Organization
    • Outdoor and Garden
  • + Holidays & Seasons
    • Spring
    • St. Patrick’s Day
    • Summer
    • Teacher Appreciation
    • Thanksgiving
    • Valentine’s Day
    • Winter
    • Back to School
    • Christmas
    • Easter
    • Fall
    • Fathers’ Day
    • Graduation
    • Halloween
    • Independence Day
    • Mothers’ Day
    • New Year’s
  • + Printables
  • + Recipes
    • Soups and Stews
    • Appetizers and Salads
    • Breads
    • Desserts
    • Food Crafts
    • Main Dish

Make Your Own Custom Bedding – Part 1

March 14, 2011 By Amy @ Positively Splendid

FacebookTweetPinYummlyPrint


Before I begin, I absolutely must thank all of you who supported me throughout the season at So You Think You’re Crafty. Even though I didn’t come out on top, it was a thoroughly enjoyable experience, and one that truly ignited my creativity! I want to congratulate Melissa on an incredible season. Her projects were all top-notch, and she is such a nice person, too!

This coordinating boy/girl room decor was my contribution for the final act of SYTYC, and today I’m going to share with you how I put the duvet covers together – for just $10 each! Ready to see what I did? I’m so excited to share!

In case you missed it, here is my blurb from SYTYC…

Having just moved into a new home, I wanted my final project for the competition to be something fun that reflects my overall crafting personality, but also something practical for our new place. We recently purchased a bunk bed for my older kiddos’ shared room, so I opted to use this challenge as my impetus to get their bedding and decor squared away. I set to work creating coordinating pillow shams and duvet covers, as well as repurposing an old lamp to match and putting together personalized alphabet samplers to adorn the walls. 

Shared boy/girl spaces can be a challenge. I wanted the bedding to coordinate, but I also wanted it to be as suitable for a boy as it was for a girl. Enter my little vinyl applique boy and girl symbols on the shams, which leave no question as to just who exactly occupies this space! I opted for turquoise and hot pink as the main colors for each of the bedding sets, tying it all together with a series of orange stripes. 

Whether you’re in the market for matching bedding as I was, or if you’re just wanting to create bedding for a single room in your home, I think you’ll find the tutorial for how I made the duvet covers particularly simple and easy to do! 

For this project, you will need…

3 flat sheets, the size of the duvet cover you are making
(1 sheet for the front, 1 for the back, and 1 for the striped accents)
Coordinating thread
Basic sewing supplies: shears, machine, measuring tape, etc.
Recommended: rotary cutter and mat

*Note: I purchased my sheets from Walmart for just $4 apiece.

Prep Work

Measure the length and width of the comforter or duvet you will be covering. Write these numbers down. Now, add 1 inch to each.
Length + 1 = X
Width + 1= Y

You’ll need to do a couple of additional calculations, as well.

Multiply X by .33. This will be A.
.33X = A

Multiply X by .67, and then add 3 to this number. This will be B.
.67X + 3 = B

Now, cut out your pieces.

From the sheet that will be the front panel piece of your duvet cover, cut 1 piece that is X by Y.

From the sheet that will be on the back of your duvet cover, you will need to cut 2 panels:
1 piece that is A by Y
1 piece that is B by Y

Note: Cut these back panel pieces from the top and bottom edges of your sheet so that one of the Y (width) sides of each falls on a hemmed edge of your sheet. This will save you from having to hem things later on – a huge time-saver!

From your striped accent sheet, cut 2 stripes:
1 stripe that is 18.5″ by Y
1 stripe that is 6.5″ by Y

Very good! Now let’s get sewing!

step 1 / Press the long edges of your stripe pieces under 1/4″, leaving the short sides unpressed. Pin your 18″ stripe 12″ up from one of the short edges of your front panel piece. Edgestitch along the long edges of your strip to secure it to your front panel. Pin your 6″ stripe 3 inches away from your first stripe, and stitch in the same manner.

step 2 / With your front panel piece face up, pin your smaller back panel piece to your front panel piece, aligning the edges and corners, as shown. (The hemmed edge of this piece should run through the center.) At each of the corners, pin a piece of ribbon or a strip of scrap fabric that is about 9 inches long and folded in half, as shown. (This will allow you to tie your cover to the corners of your comforter to keep your comforter from becoming all bunched up in the bottom of your cover.)
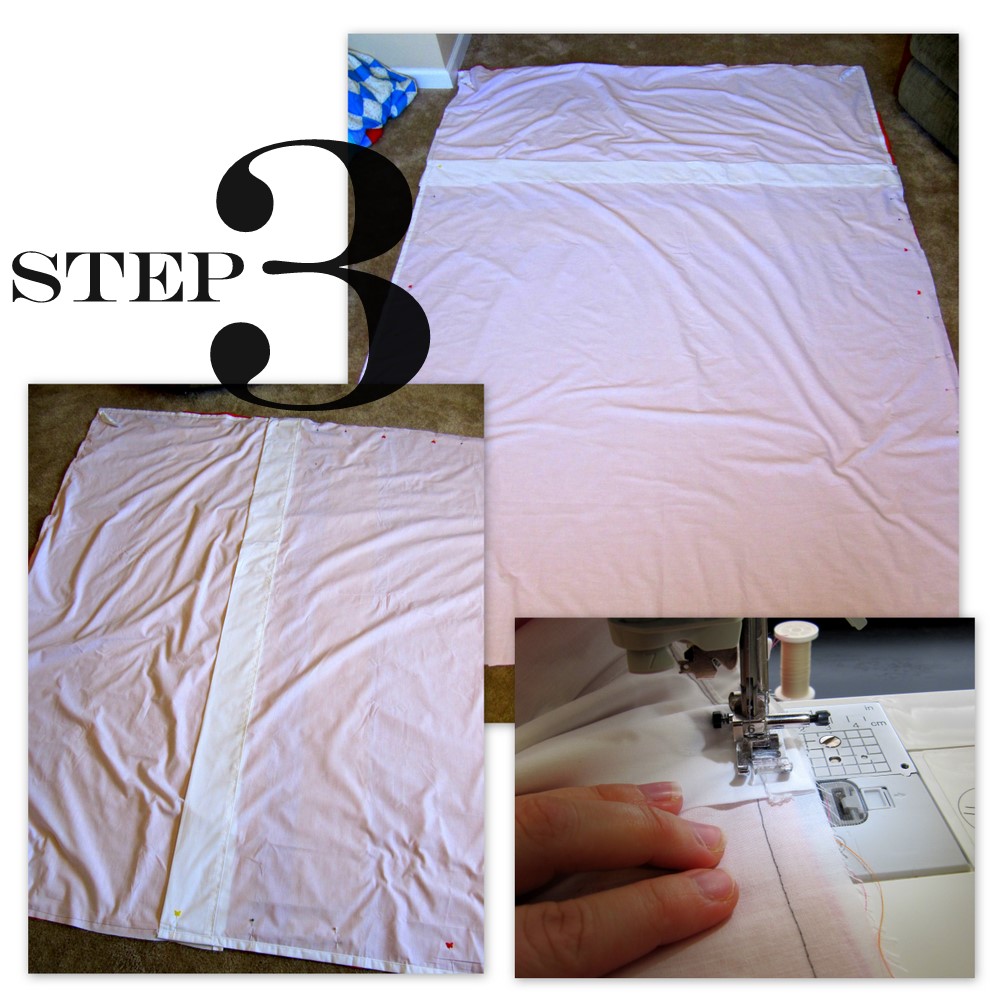
step 3 / Pin your longer back panel piece in the same manner, making sure the hemmed edge of this piece overlaps the hemmed edge of the piece you pinned in step 2. Pin folded pieces of ribbon or fabric to these corners, as well. Using a 1/2″ seam allowance, stitch all layers together. If desired, serge or zig-zag your seams to finish. Clip your corners, turn your cover right side out, and use a turning tool (or a wooden chopstick) to help you push your seams and corners out thoroughly. Press.
Now, set snaps (or apply buttons) on the overlapping flaps of your cover so that it remains closed when in use. I recommend at least 5-6 buttons or snaps to ensure there isn’t any gapping.
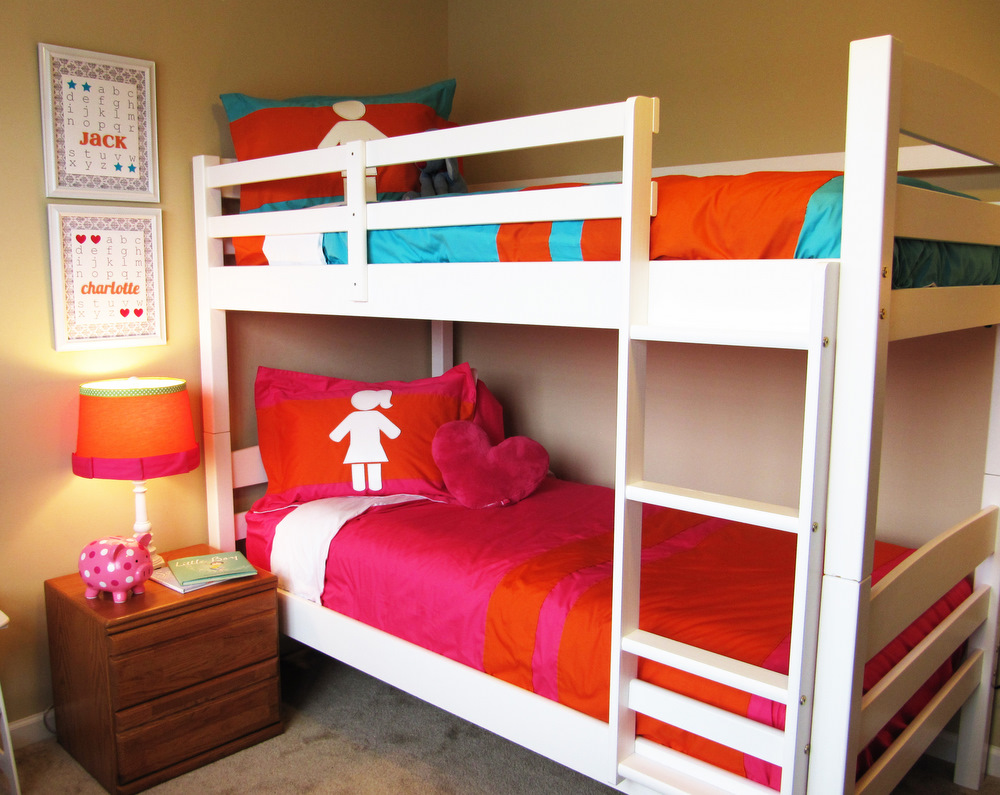
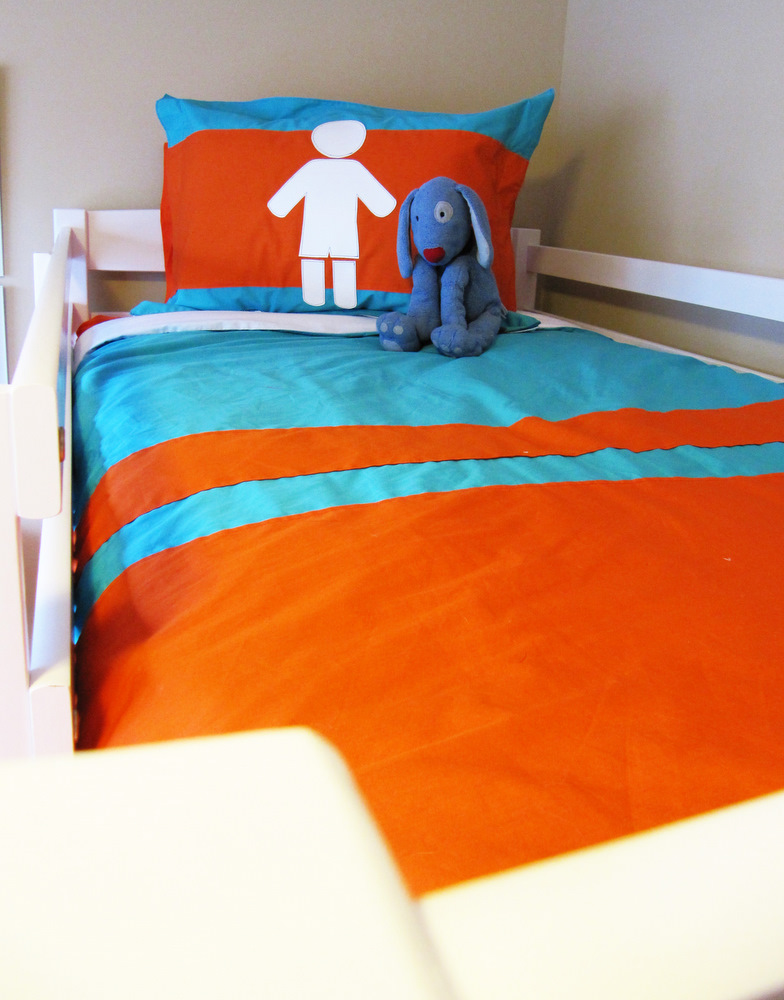
Your duvet cover is done!

Don’t forget to check out the other parts of this series:
Part 2 – The Shams
 Part 3 – The Alphabet Sampler Printable and Lamp

Photobucket

Linking this to…
Skip to my Lou

Amy @ Positively Splendid

Having grown up in a home brimming with sewing notions and paintbrushes, Amy has a deep love for all things creative. On any given day, you’ll find her knee-deep in her latest creative endeavor, with projects ranging from sewing and crafts to home decor and kid-friendly ideas. Amy believes that everyone, regardless of skill level or experience, possesses the ability to create something beautiful, and Positively Splendid was born of her passion for helping others harness their innate creative potential.

EVEN MORE GREAT IDEAS JUST FOR YOU!

FacebookTweetPinYummlyPrint

Filed Under: Sewing, Tutorials Tagged With: SYTYC

Previous Post: « The Embellished Five: Fleece Pullover Edition
Next Post: Boy/Girl Pillow Shams – Custom Bedding, Part 2 »

Reader Interactions

Comments

  1. Rhonda says

    March 14, 2011 at 12:12 pm

    Great job, I am a newby sewer and just finished a queen duvet cover for my step daughters room. It was very tedious working with so much material, but was a ton of fun!
    Will watch for your sham tutorial!
    Thanks

  2. Kann says

    March 14, 2011 at 12:34 pm

    These are great… another thing I have done in doing this project is bought one of those cheap heavy blankets at Walmart for about $4 and put them on the inside to give the cover a little weight.. but I live in Maine so it is necessary!

  3. claudia b says

    March 14, 2011 at 1:58 pm

    i am definitely planning on making these for my boys, thanks for the tutorial!

    I’ve just awarded you a Stylish Blogger badge, check out my blog for details, thanks!

  4. Kelli @ RTSM says

    March 14, 2011 at 2:53 pm

    These turned out so cute! This may just be my solution to finding matching bedding for my boys! Thansk for the great tutorial Amy!

  5. Michele {The Scrap Shoppe} says

    March 14, 2011 at 3:19 pm

    I hate you didn’t win, Amy, but this bedding is fantastic! I’m in love with the pillow shams. 🙂

  6. Brittney says

    March 14, 2011 at 4:37 pm

    So cute, & I LOVE the blog make-over!! 🙂

  7. Jill says

    March 15, 2011 at 10:53 pm

    Wow! The bedding is great. I love how bright and colorful it is.

  8. Julie {CalleLillyCafe} says

    March 16, 2011 at 5:04 am

    the girl pillowcase caught my eye! love it & I love orange & pink together! =)

  9. Kiwi The Kreator says

    March 23, 2011 at 4:04 am

    SUCH an awesome way to incorporate both sexes into one space!!!

  10. Karin says

    April 9, 2011 at 11:51 pm

    I love this project! Also love the simple white bunkbed–Can you tell me where you got the bunk beds?

  11. Moppet Musings says

    February 28, 2012 at 7:00 pm

    Ditto what Karin said. Where did you get the bunk bed -it’s just what we’ve been searching for? I love the bedding and hope to give it a try.

  12. Rebecca M says

    December 31, 2012 at 2:23 pm

    Wonderful bedding & just what I’m looking for! We just ordered bunk beds for our son & daughter, & I’d like their spaces to be individual yet harmonious. This is perfect & sounds simple enough to do even with kids running around. I also love the shams with the classic boy/girl symbols, & plan to make it all. Thank you for giving me the solution I was searching for!!! 🙂

Primary Sidebar

PS Search

Search this website

Seasonal Inspiration

Hocus Pocus Wreath
Ghost Plushies
Paper Pumpkins
Fabric Yo-Yo Pumpkins

Copyright © 2025 · Positively Splendid · All Rights Reserved. · Privacy Policy

Privacy & Cookies: This site uses cookies and other tracking technologies to assist with navigation and your ability to provide feedback, analyse your use of our products and services, assist with our promotional and marketing efforts, and provide content from third parties. To find out more, as well as how to remove or block these, see here: Our Cookie/Privacy Policy