• Skip to primary navigation
  • Skip to main content
  • Skip to primary sidebar

Positively Splendid {Crafts, Sewing, Recipes and Home Decor}

Handcrafted. Splendidly.

  • Home
  • Blog
  • + Handmade
    • Crafts
      • Craft Gift Ideas
      • Holiday Crafts
      • Home Decor Crafts
      • Kids’ Crafts
      • Paper Crafts
      • Quick and Easy Crafts
      • Wearable Crafts
      • Wreaths
    • Gift Ideas
      • Budget-Friendly Gifts
      • Gift Wrapping
      • Gifts for Dads and Grandpas
      • Gifts for Kids
      • Gifts for Men
      • Gifts for Moms and Grandmas
      • Gifts for Neighbors
      • Gifts for Sports Fans
      • Gifts for Teachers
      • Gifts for Women
      • Quick and Easy Gifts
    • Kid-Friendly Projects
    • Sewing
      • Sewing for Children
      • Sewing for Men
      • Sewing for the Home
      • Sewing for Women
      • Sewing Techniques
      • Sewn Accessories
      • Sewn Gifts
  • + Home & Garden
    • DIY Home Decor Projects
    • Helpful Tips
    • Home Decor Crafts
    • DIY
    • Home Tour
    • Mantels and Tablescapes
    • Organization
    • Outdoor and Garden
  • + Holidays & Seasons
    • Spring
    • St. Patrick’s Day
    • Summer
    • Teacher Appreciation
    • Thanksgiving
    • Valentine’s Day
    • Winter
    • Back to School
    • Christmas
    • Easter
    • Fall
    • Fathers’ Day
    • Graduation
    • Halloween
    • Independence Day
    • Mothers’ Day
    • New Year’s
  • + Printables
  • + Recipes
    • Soups and Stews
    • Appetizers and Salads
    • Breads
    • Desserts
    • Food Crafts
    • Main Dish

Faux Hammered Copper Tutorial

July 11, 2011 By Amy @ Positively Splendid

FacebookTweetPinYummlyPrint
Today’s project was born out of necessity. I have a piece of furniture that is fine in its own right, but that needed some tweaking to make it suitable for its current prominent location in our front entry. For a bit of enlightenment as to the situation surrounding this piece, refer to the letter below.


You see, the table in question was purchased in my naive, before-kids days. I am sure those of you with children remember those days, when you could decorate and buy to your heart’s content, never thinking of the  havoc that can be wreaked by pint-sized hands.

Needless to say, those days are behind me. 😉

So. Here was my issue with this table. As stated in the letter above, the glass-paneled doors were constantly smudged with hand/fingerprints and who-knows-what-else. The fact that this piece needed to earn its keep by storing all of our board games, yet the transparency of the doors made the act of doing so a true eyesore, made it obvious that something needed to be tweaked.

Oh. See those baskets on the right? That actually used to be another door just like the others until an unfortunate accident caused one to be shattered (five years ago), and I never got around to getting it fixed. I think the baskets do just fine, thank you! Although I would love to get around to making liners for them one of these days.
 It must be something from my New Mexico upbringing, but I adore the look and texture of hammered metal. In figuring a way to upgrade the doors of the piece easily, I started looking into purchasing hammered copper ceiling tiles that I could trim down to fit in the opening of each door. Two problems there: (1) The panels were difficult to find locally and (2) It was nearly impossible to find a place to order them online that didn’t force me to buy in bulk.


So, in typical Amy fashion, I put on my thinking cap for how to achieve the look I wanted without having to spend a fortune. And then I saw this gorgeous tutorial on All Things Thrifty using paintable wallpaper. Eureka!

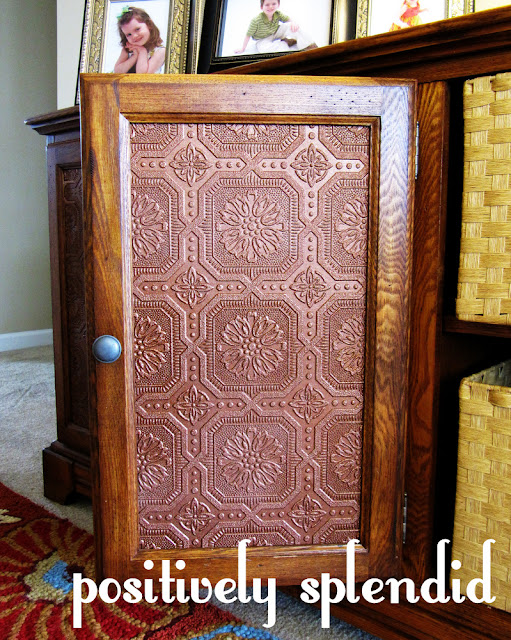
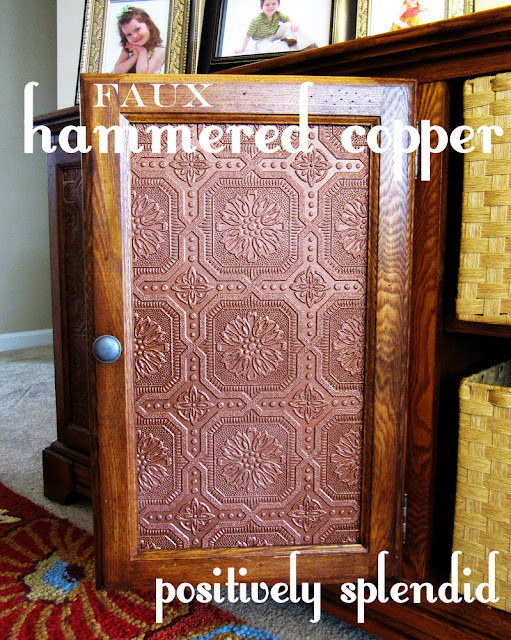
I removed the glass panels from the doors to measure them, and then I had the lovely guys and Lowes trim me two pieces of thin MDF (3 mm thick, I believe) to fit the opening. I covered each piece in paintable wallpaper in a ceiling tile pattern from Lowes, making sure the pattern on each door lined up precisely. After allowing the paper to dry overnight, I sprayed each one with Valspar metallic copper paint. Once they were dry, I tucked each one in place of the glass panels (my doors were outfitted with knobs to hold the pieces in place). That was it!


It’s a subtle change, but it makes my heart happy to have things look so much tidier!

I can see so many other uses for the panels I created here. They would make gorgeous wall art, or backsplashes in vignettes on mantels or tabletops. My creative wheels are turning!

Thanks so much for stopping by!

Photobucket

Linking this to…
Home Stories A to Z

Amy @ Positively Splendid

Having grown up in a home brimming with sewing notions and paintbrushes, Amy has a deep love for all things creative. On any given day, you’ll find her knee-deep in her latest creative endeavor, with projects ranging from sewing and crafts to home decor and kid-friendly ideas. Amy believes that everyone, regardless of skill level or experience, possesses the ability to create something beautiful, and Positively Splendid was born of her passion for helping others harness their innate creative potential.
EVEN MORE GREAT IDEAS JUST FOR YOU!

FacebookTweetPinYummlyPrint

Filed Under: DIY Home Decor Projects, Positively Home & Garden, Tutorials Tagged With: Furniture

Previous Post: « Clean Mama Printables Giveaway!
Next Post: Chocolate Pudding Cake Recipe »

Reader Interactions

Comments

  1. Kelli @ RTSM says

    July 11, 2011 at 2:17 pm

    Great makeover Amy! We used that same wallpaper to add a little interest to our guest bath a few months ago:)

  2. tcrescini says

    July 11, 2011 at 2:33 pm

    Love it! It looks awesome!

  3. Stacy Orndorff says

    July 11, 2011 at 2:33 pm

    This comment has been removed by the author.

  4. Stacy Orndorff says

    July 11, 2011 at 2:34 pm

    Genius!

  5. Kara says

    July 11, 2011 at 2:43 pm

    As soon as I saw the photo, I knew just what you had used. I saw that wallpaper at Lowes last week. LOL!
    It turned out just amazing!! And I like the look of the baskets on the side. 🙂

  6. Sally J says

    July 11, 2011 at 2:59 pm

    I’ve used this paper a few times and faux painted it in copper. I just did a post on copper on my blog http://divinedistractions.blogspot.com/2011/07/copper-highlights.html
    and the last pic is my kitchen ceiling that i did in the faux copper. I love that stuff, and you’re piece really is transformed! Love it.

  7. Jen @ tatertotsandjello.com says

    July 11, 2011 at 3:00 pm

    Amy!! It is beautiful! What a smart idea 🙂

    xoxox
    Jen

  8. Jen @ My Own Road says

    July 11, 2011 at 3:35 pm

    Gorgeous!! What a fantastic idea to update a piece of furniture. Definitely pinning this!

  9. Maureen says

    July 11, 2011 at 4:10 pm

    That is BEAUTIFUL!!! Amazing, as always 🙂

  10. Amanda @ Serenity Now says

    July 11, 2011 at 4:33 pm

    Fabulous work, Amy! What a great solution. Love the new look. 🙂

  11. Jeni says

    July 11, 2011 at 4:50 pm

    LOVE this idea!

  12. Jill says

    July 11, 2011 at 5:30 pm

    LOVE!

  13. VickiT says

    July 11, 2011 at 6:12 pm

    Oh what a great idea. I saw this and right away my mind was racing. I wonder how this idea could be applied to a kitchen ceiling so it would look like those old tin tiled ceilings. I wonder if applying it to a thin wood and then framing each wood piece with metal trim and then installing that onto a ceiling if it would look good or anything like those old tin ceilings? I have always wanted one of them in my kitchen but wow are those tin replica tiles expensive. This could be a solution. hmmmmmm How I wish I were back ten years ago when my legs would have allowed me to try it. Heck back then, I’d already be out the door on my way to buying the stuff to try it out. LOL

  14. Allie says

    July 11, 2011 at 7:40 pm

    Perfect!! I’ve seen that post on her blog before. She is a genius sometimes. This is such a great way to use that idea! Love how it turned out!

  15. Angie @ The Country Chic Cottage says

    July 11, 2011 at 9:06 pm

    That is gorgeous Amy!! Great idea! And it looks fab!!

  16. Michele {The Scrap Shoppe} says

    July 15, 2011 at 12:57 am

    Love this, Amy! Ingenius idea!

  17. Colleen @ MuralMaker&More says

    July 30, 2011 at 3:58 am

    I so love this – I don’t know where to start! Ok, first with the letter to yourself. Too cute 😀 But the wallpaper thing? LOVE it! I’m lookin’ around for something to cover w/it – ha!

Primary Sidebar

PS Search

Search this website

Seasonal Inspiration

Hocus Pocus Wreath
Ghost Plushies
Paper Pumpkins
Fabric Yo-Yo Pumpkins

Copyright © 2023 · Positively Splendid · All Rights Reserved. · Privacy Policy

Privacy & Cookies: This site uses cookies and other tracking technologies to assist with navigation and your ability to provide feedback, analyse your use of our products and services, assist with our promotional and marketing efforts, and provide content from third parties. To find out more, as well as how to remove or block these, see here: Our Cookie/Privacy Policy