• Skip to primary navigation
  • Skip to main content
  • Skip to primary sidebar

Positively Splendid {Crafts, Sewing, Recipes and Home Decor}

Handcrafted. Splendidly.

  • Home
  • Blog
  • + Handmade
    • Crafts
      • Craft Gift Ideas
      • Holiday Crafts
      • Home Decor Crafts
      • Kids’ Crafts
      • Paper Crafts
      • Quick and Easy Crafts
      • Wearable Crafts
      • Wreaths
    • Gift Ideas
      • Budget-Friendly Gifts
      • Gift Wrapping
      • Gifts for Dads and Grandpas
      • Gifts for Kids
      • Gifts for Men
      • Gifts for Moms and Grandmas
      • Gifts for Neighbors
      • Gifts for Sports Fans
      • Gifts for Teachers
      • Gifts for Women
      • Quick and Easy Gifts
    • Kid-Friendly Projects
    • Sewing
      • Sewing for Children
      • Sewing for Men
      • Sewing for the Home
      • Sewing for Women
      • Sewing Techniques
      • Sewn Accessories
      • Sewn Gifts
  • + Home & Garden
    • DIY Home Decor Projects
    • Helpful Tips
    • Home Decor Crafts
    • DIY
    • Home Tour
    • Mantels and Tablescapes
    • Organization
    • Outdoor and Garden
  • + Holidays & Seasons
    • Spring
    • St. Patrick’s Day
    • Summer
    • Teacher Appreciation
    • Thanksgiving
    • Valentine’s Day
    • Winter
    • Back to School
    • Christmas
    • Easter
    • Fall
    • Fathers’ Day
    • Graduation
    • Halloween
    • Independence Day
    • Mothers’ Day
    • New Year’s
  • + Printables
  • + Recipes
    • Soups and Stews
    • Appetizers and Salads
    • Breads
    • Desserts
    • Food Crafts
    • Main Dish

Felt Bunny Pants Treat Bags

March 22, 2010 By Amy @ Positively Splendid

FacebookTweetPinYummlyPrint
With the advent of spring, my crafting focus always turns to fun Easter crafts. These sweet felt bunny pants treat bags will delight children of all ages, and they are a quick and easy sewing project, even for beginners. Let me show you how it’s done!

I always have my eyes peeled for crafting inspiration. I pore over catalogs when they arrive in the mail and earmark the ideas that catch my eye. A couple of weeks ago when I was browsing my latest Lillian Vernon catalog, I came across some adorable little Easter bunny pants treat bags that I knew the kiddos would love. At close to $4 apiece (plus shipping!), though, I knew it would be far more cost-effective to make my own. So I went ahead and came up with my own little method for doing just that!

These little gems are an absolute breeze to put together. They will make a perfect addition to the kiddos’ Easter baskets, and the wheels are already turning in my mind over how to tweak the design to make Santa pants at Christmas!

Supplies:

  • Bunny Pants Treat Bag Pattern << free download
  • Felt in various colors
  • Coordinating thread
  • Pinking shears (optional, but I really love the look of pinked edges on felt)
  • Sharpie marker (I find it nearly impossible to write on felt with anything else)
  • 2-inch white pom-poms
  • Hot glue gun
  • Buttons
To begin, cut out all of your pieces using the template provided. You will need 2 pant body pieces, 2 belt pieces and 4 strap pieces. For a decorative touch, use pinking shears to cut out some or all of the pieces.
Pin the belt pieces to the waist portion of the pant pieces; pin. Edgestitch around the belt pieces to attach them to the pant body pieces.
Place the two pant body pieces together, right sides facing, aligning all raw edges. Stitch the pants together along the right and left curves (refer to the photos below) using a 1/4″ seam allowance. Fold the pants so that the seams you just sewed are aligned at the center, making sure the lower edges of the pant legs are precisely aligned. Pin.
Using a 1/4″ seam allowance, stitch the lower pant edge closed with a continuous line of stitching, as shown.
Use a Sharpie to draw lines 5/8″ from the bottom and side seams of each pant leg, as shown, so that the lines at each corner meet at a 90-degree angle. (Refer to the photos below.) Carefully trim away these squares, and then use a machine to stitch at the point in the seams where the cuts are made to prevent the stitching from coming loose.
Pinch the inner corners of each set of notched squares together to align the side and lower pant seams. Pin and stitch along the cut edge with a 1/4″ seam. This will create a set of boxed corners on each pant leg.
Pin the strap pieces in two sets of double layers; edgestitch around each set to secure them together.
Affix the completed straps to the assembled pant body, as shown, with the strap edges extending about 3/4″ below the pant edges. Use either a needle and thread or hot glue to affix the straps to the pants. Embellish further with buttons and a pom-pom tail.
That’s all there is to it!
Now, hop to it and get a pair of these little darlings made. (And please forgive me for the gratuitous hopping reference. I just couldn’t help myself. 😉
Enjoy, and please let me know if you have any questions!

Amy @ Positively Splendid

Having grown up in a home brimming with sewing notions and paintbrushes, Amy has a deep love for all things creative. On any given day, you’ll find her knee-deep in her latest creative endeavor, with projects ranging from sewing and crafts to home decor and kid-friendly ideas. Amy believes that everyone, regardless of skill level or experience, possesses the ability to create something beautiful, and Positively Splendid was born of her passion for helping others harness their innate creative potential.

EVEN MORE GREAT IDEAS JUST FOR YOU!

FacebookTweetPinYummlyPrint

Filed Under: Crafts, Easter, Gift Ideas, Gifts for Kids, Holiday Crafts, Positively Seasons, Sewing, Sewing for Children, Sewn Gifts, Tutorials Tagged With: Bunny, Crafts, Easter, Freebies, Patterns, Tutorials

Previous Post: « Happy spring
Next Post: Homemade Bird and Squirrel Feeders »

Reader Interactions

Comments

  1. Kelli @ RTSM says

    March 22, 2010 at 1:41 pm

    So cute! I think I need to get a pair of pinking shears!

  2. Brooke says

    March 22, 2010 at 1:58 pm

    Wow! They look so cute. That is a very good idea. You did a wonderful job. Thanks for sharing.

  3. The Persimmon Perch says

    March 22, 2010 at 2:52 pm

    How cute and whimsical! Thanks for sharing with Made it Monday! Jules

  4. shannon i olson says

    March 22, 2010 at 3:28 pm

    cute bag, wonderful photos!

  5. Martha Cavazos Fipps says

    March 22, 2010 at 8:26 pm

    LOVE those! So adorable. Thanks for posting a tutorial too!

    Martha @ MCSQRD
    Blooming Where I am Planted!

    PS: Thanks for visiting my blog!

  6. Nicole says

    March 22, 2010 at 9:42 pm

    How cute! What a fun thing to make for Easter!

  7. Patti says

    March 22, 2010 at 9:51 pm

    These are so sweet…love the pompom tail!

  8. Aprons Gone Wild says

    March 22, 2010 at 11:50 pm

    Awww…those little bags are adorable. Thanks for the idea.
    And thanks for visiting my blog.
    Joanne

  9. Mary Beth @ Live. Laugh. Make Something says

    March 23, 2010 at 2:19 am

    Delightful! …just cute as can be! …and what great photography! I hopped over from Skip to My Lou and I am so happy that I did! Please accept my invitation to drop in at my place one day this week when you get a moment. until later…

  10. Williams Family says

    March 23, 2010 at 2:42 am

    Love it! So creative!

  11. j.anne photography says

    March 23, 2010 at 2:52 am

    After reading your blog… I must clear my Facebook status. I feel like a big pot of whiney stew after seeing what you do with your day!! :o)

  12. Carole says

    March 23, 2010 at 5:13 am

    So cute!

  13. Misty says

    March 23, 2010 at 1:19 pm

    These are simply adorable!!! Thanks for linking @Creative Itch’s “Sew Cute Tuesday”!!

  14. Stephanie @ Minutes to Spare says

    March 23, 2010 at 1:24 pm

    These are absolutely darling. I will need to make 5!!! I better get hopping.

  15. Jingle says

    March 23, 2010 at 1:30 pm

    Those are super cute! What a great idea!

  16. Tammy says

    March 23, 2010 at 1:32 pm

    This is totally cute! I just might have to dust off my sewing machine for this project 🙂

  17. the VG huis says

    March 23, 2010 at 1:35 pm

    Just stopping by to say thanks for your nice comment! These little treat bags are adorable! So nice to meet new friends!

    warmly,

    Stacey

  18. Dee says

    March 23, 2010 at 2:48 pm

    Those are the cutest ever!!! Makes me want to celebrate Easter…we don’t have any cute animals associated with Passover! Its hard to make the 10 plagues fun or cute!

  19. Holly says

    March 23, 2010 at 5:16 pm

    That is seriously adorable and what a fun way to hide/display/show off the eggs.

  20. Michele {The Scrap Shoppe} says

    March 23, 2010 at 6:00 pm

    Oh.My.Goodness. Too stinking cute! Great tutorial!

    Also, I am now just itching to make a silhoutte wall hanging of my sons. I will be stalking him all week with the camera! Great project!

  21. the cupcake fairy says

    March 23, 2010 at 7:01 pm

    great idea~love it!

  22. Sandy says

    March 23, 2010 at 7:37 pm

    I so enjoyed this post!

    Sandy

    http://thewondersofdoing.blogspot.com/

  23. Andrea @ TheTrainToCrazy.com says

    March 23, 2010 at 8:52 pm

    So cute! Thanks for sharing!

  24. Army Wife Quilter says

    March 23, 2010 at 10:51 pm

    wow I love these and i think they would translate great to santa pants for christmas thanks for the tutorial.

  25. Kristi Flanagan says

    March 24, 2010 at 1:10 pm

    These are so darn cute! I’d like to invite you to come plant your “creative seeds” at my new blog party on Fridays “Plant a Punkin Seed at Punkin Seed Productions”.

    Hope to see you there!

    Kristi
    Punkin Seed Productions

  26. Sherry says

    March 24, 2010 at 11:22 pm

    Those are adorable! I love your pins.
    Win Rachael Ray bake ware at my blog.
    Thanks!

  27. fawnda says

    March 25, 2010 at 11:12 pm

    Now those are just too cute! I love the bunny tail on it! : )

  28. Andy Porter says

    March 26, 2010 at 12:57 pm

    Oh my gosh, those are too cute!! Thanks for linking to CC!!!

  29. {All Thingz Related} says

    March 28, 2010 at 12:32 am

    Oh my goodness…I love the one with the bunny tail! hehe My girls would love these!
    ~Bridgette

  30. Nancy's Couture says

    March 30, 2010 at 4:04 pm

    These are the most adorable things I have seen in a while!!!! I LOVE them!!!!!

  31. Sarah says

    March 31, 2010 at 12:21 am

    Those are the cutest bunny bags! Absolutely adorable!!!
    God’s blessings,
    Sarah 😀

  32. Stacey @ Fun to Craft says

    April 1, 2010 at 1:17 am

    These are the cutest!! What a great idea! Thanks for sharing at Fun to Craft’s Spring has Sprung Party.

  33. [email protected] says

    July 4, 2010 at 3:22 am

    Very cute! Thanks for sharing….I’ve posted a couple of links.

  34. Tammy says

    January 5, 2011 at 3:49 pm

    Oh my word! These are just way too cute!!!

  35. Ginger says

    March 1, 2011 at 3:16 pm

    Wow this is a wonderful treat for all of us!
    Winderful blog awesome craft!
    you rock!

  36. Bec @ eleventhirtyish says

    April 8, 2011 at 12:55 am

    Love them! They are super duper cute! so happy i found your blog i’m gonna stay awhile and have a look around! Would love you to HOP over and visit me sometime xx Bec

  37. Erin says

    April 16, 2011 at 4:51 am

    These are awesome! I wish I could sew!!!

  38. Jennifer says

    April 25, 2011 at 3:12 pm

    I finally got to make these this weekend for my 4 kiddos as an extra Easter gift. They turned out better than I could have expected! I LOVE when I can start and complete a project all in one day. 🙂 Thank you!

    Jennifer

  39. Cigarra Arte says

    February 1, 2012 at 12:36 am

    This comment has been removed by the author.

  40. Cigarra Arte says

    February 1, 2012 at 12:36 am

    AMEI!!!!!!!!!!!LINDO!!!!!!!!!
    Bjs,
    Cynthia
    http://www.cigarraarte.blogspot.com/

  41. Jessica @ Sunny Tuesday says

    March 4, 2012 at 1:05 am

    Eeep! How CUTE are those little tails?!?

  42. Kelly says

    March 17, 2013 at 4:36 pm

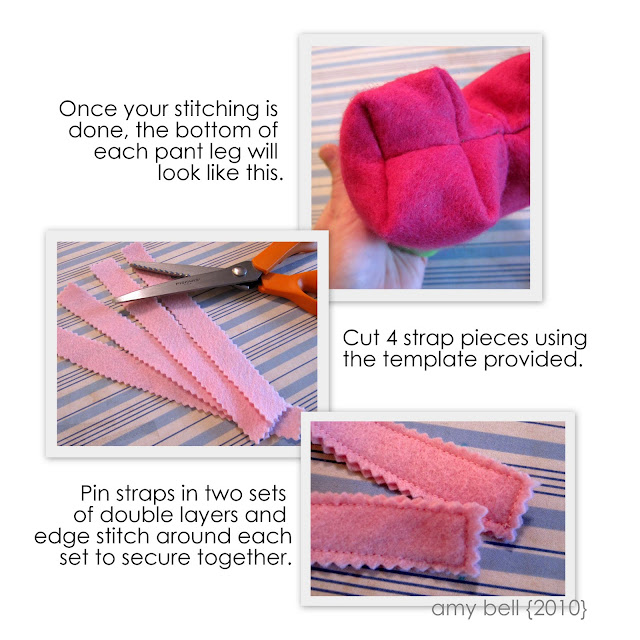
    Making this today with my 8 year old little boy. Just a note… the tutorial says to cut 4 straps but the pattern says cut 3. It looks like you do indeed need 4.

    • Amy @ Positively Splendid says

      March 18, 2013 at 9:02 am

      Thanks for the heads-up, Kelly! That is a typo, and you do need 4 strap pieces.

Primary Sidebar

PS Search

Search this website

Seasonal Inspiration

Hocus Pocus Wreath
Ghost Plushies
Paper Pumpkins
Fabric Yo-Yo Pumpkins

Copyright © 2023 · Positively Splendid · All Rights Reserved. · Privacy Policy

Privacy & Cookies: This site uses cookies and other tracking technologies to assist with navigation and your ability to provide feedback, analyse your use of our products and services, assist with our promotional and marketing efforts, and provide content from third parties. To find out more, as well as how to remove or block these, see here: Our Cookie/Privacy Policy


Loading Comments...