• Skip to primary navigation
  • Skip to main content
  • Skip to primary sidebar

Positively Splendid {Crafts, Sewing, Recipes and Home Decor}

Handcrafted. Splendidly.

  • Home
  • Blog
  • + Handmade
    • Crafts
      • Craft Gift Ideas
      • Holiday Crafts
      • Home Decor Crafts
      • Kids’ Crafts
      • Paper Crafts
      • Quick and Easy Crafts
      • Wearable Crafts
      • Wreaths
    • Gift Ideas
      • Budget-Friendly Gifts
      • Gift Wrapping
      • Gifts for Dads and Grandpas
      • Gifts for Kids
      • Gifts for Men
      • Gifts for Moms and Grandmas
      • Gifts for Neighbors
      • Gifts for Sports Fans
      • Gifts for Teachers
      • Gifts for Women
      • Quick and Easy Gifts
    • Kid-Friendly Projects
    • Sewing
      • Sewing for Children
      • Sewing for Men
      • Sewing for the Home
      • Sewing for Women
      • Sewing Techniques
      • Sewn Accessories
      • Sewn Gifts
  • + Home & Garden
    • DIY Home Decor Projects
    • Helpful Tips
    • Home Decor Crafts
    • DIY
    • Home Tour
    • Mantels and Tablescapes
    • Organization
    • Outdoor and Garden
  • + Holidays & Seasons
    • Spring
    • St. Patrick’s Day
    • Summer
    • Teacher Appreciation
    • Thanksgiving
    • Valentine’s Day
    • Winter
    • Back to School
    • Christmas
    • Easter
    • Fall
    • Fathers’ Day
    • Graduation
    • Halloween
    • Independence Day
    • Mothers’ Day
    • New Year’s
  • + Printables
  • + Recipes
    • Soups and Stews
    • Appetizers and Salads
    • Breads
    • Desserts
    • Food Crafts
    • Main Dish

No-Sew Storage Bins from Diaper Boxes

September 10, 2012 By Amy @ Positively Splendid

FacebookTweetPinYummlyPrint


Last week, I shared the details about my brand-new home office and sewing room, a small space that is big on hidden storage. One of my favorite ways to maximize the functionality of any room is to have many items that I use frequently hidden in plain sight, and one tutorial I return to again and again to accomplish that feat is my diaper box canvas bin how-to. 

In my new office space, I needed a place to store my camera and its accessories, and I knew two of these bins placed on the bottom shelf of the bookcase in the room would be perfect for just that. 


Since I first shared these last year, I have made numerous versions to place in various rooms in our home. You might remember these, which can be found in the built-ins in our family room, and are used to house our family’s movie collection…


…and these, which I made to hold toys in George’s nursery.


As you can see in the bins above, I typically opt to sew liners for each bin. Because I was crunched for time this time around, though, I opted to come up with a way to mimic the look of liners without having to sew a single stitch! Here’s how I did it.

First, I covered my diaper boxes using the method detailed in my original diaper box canvas bin post. (By the way, I have discovered that it is very cost-effective to cover the boxes with canvas drop cloths rather than with canvas material purchased by the yard.)

With the box covered, I measured all the way around the top edge of my box, and then added 2 inches to that measurement. My box measured 41 inches around, so: 

41″ + 2″ = 43″

I then measured down from the top edge of the box to the point I wanted the edge of the liner to fall on the outside of the box. 


I decided I wanted mine to end 4.5 inches from the top edge of the box. I added 2 inches to that measurement, to compensate for the amount of material that would be folded toward the inside of the box later on. Thus:

4.5″ + 2″ = 6.5″.

I used those dimensions to cut my decorative liner piece, which was 43″ x 6.5″.

In order for this to be a completely no-sew project, I knew the material I used for the liner piece needed to be something that wouldn’t fray once it was cut. Felt and fleece would both fit that bill, but I opted to use some of my favorite material, marine vinyl. 

As you can see, this material comes in an assortment of lovely colors (pictured above is the selection at my local Jo-Ann store), and it has a nice, crisp edge once it is cut. Perfect!

Once my liner piece was cut, I used a scallop template (available for download below) to add a decorative touch to one of the edges. I traced the template onto the back side of the material using a Sharpie…


…and then I carefully cut along the traced lines. Note: It is very important to cut very carefully in this step, as this edge will be the finished edge of your liner piece!


With my scalloped edge complete, I used my hot glue gun to affix the liner piece to my bin, making sure the bottom edge of the scallop measured 4.5″ from the top of the box (my measurement from above) as I worked. I overlapped the two ends of my liner pieces at the back of my bin so that the final project would be nice and polished.


I affixed the visible (outside) portion of the liner piece first before folding over the excess toward the inside of the box and securing it with hot glue.

Finally, I outfitted the front of the bin with a felt bow made using my no-sew felt bow tutorial (available for free to all PS Facebook fans).


All finished!

I love how these bins turned out. The leather look of the vinyl gives them such a professional appearance!


Once I finished the set for my sewing space, I made another bin for my craft closet, to store crafts in progress. For this version, I used the same method, but I opted to use felt instead of vinyl. I accented the front of the bin with a decorative bow made with ribbon and a chalkboard vinyl decal for easy labeling.


As you can see, there are so many options for these bins! If you want to try your hand at creating a set of your own, download my scallop template for free by clicking on the arrow in the bottom right-hand side of the box below. (If you’re enjoying this post in a reader or via email subscription, you’ll have to click over to the blog for the download.)


Thanks so much for stopping in!

Photobucket

Linking this to…
Serenity Now
Home Stories A to Z
Tidy Mom
Tatertots and Jello
Flamingo Toes
A Glimpse Inside

Amy @ Positively Splendid

Having grown up in a home brimming with sewing notions and paintbrushes, Amy has a deep love for all things creative. On any given day, you’ll find her knee-deep in her latest creative endeavor, with projects ranging from sewing and crafts to home decor and kid-friendly ideas. Amy believes that everyone, regardless of skill level or experience, possesses the ability to create something beautiful, and Positively Splendid was born of her passion for helping others harness their innate creative potential.

EVEN MORE GREAT IDEAS JUST FOR YOU!

FacebookTweetPinYummlyPrint

Filed Under: Crafts, DIY, DIY Home Decor Projects, Home Decor Crafts, Home Decor Crafts, Organization, Positively Home & Garden, Tutorials Tagged With: home office, sewing room, Storage Ideas

Previous Post: « Seven Fall Decor Ideas
Next Post: DIY Magazine Files (Free Template) »

Reader Interactions

Comments

  1. Amanda @ Serenity Now says

    September 10, 2012 at 11:30 am

    Love the marine vinyl, Amy! What a cool touch. 🙂 Great way to make a new spin on and old favorite!

  2. Holly @ abakershouse.com says

    September 10, 2012 at 1:53 pm

    I hadn’t heard about marine vinyl and will be on the look out for it now. Looks like it would be great for so many projects!

  3. Carla Belyea says

    September 11, 2012 at 10:44 am

    Where do you buy your canvas drop cloths?

  4. Torrie says

    September 12, 2012 at 5:16 pm

    You are so amazing! Thank you for the inspiration.

  5. Michele {The Scrap Shoppe} says

    September 12, 2012 at 5:28 pm

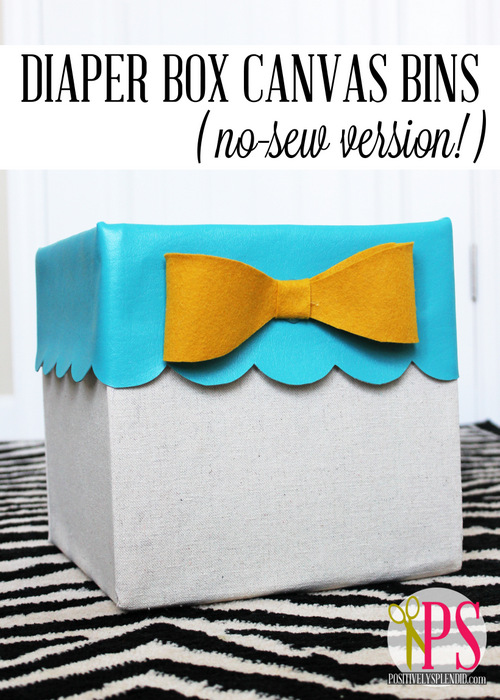
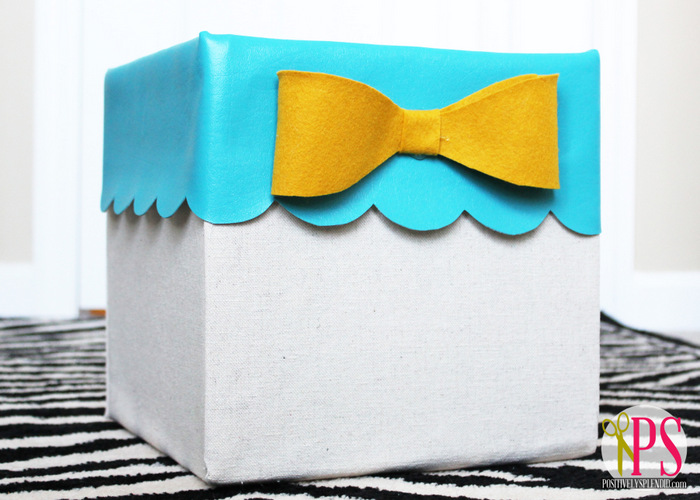
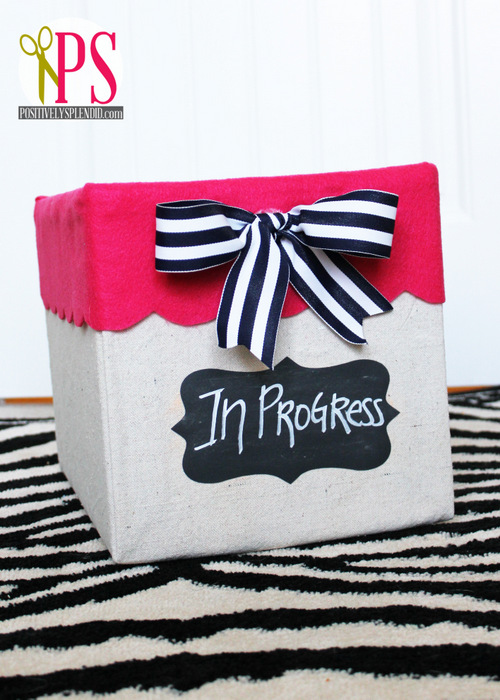
    Love this, Amy! You know I’m a big fan of your covered diaper boxes. And this is my kind of version (no sew)! 🙂

  6. Richard Lebow says

    September 13, 2012 at 2:43 am

    I was having trouble getting and keeping my units organized, so I went to a local Western Store and asked for their extra Boot Boxes. They are very sturdy and free.(some come with plastic handles, too). I use them to store my thematic activities. This makes it some much easier to have what I need in one spot. It also looks very neat and clean/uniform in my closet.

    Storage Boxes

  7. joyced says

    September 14, 2012 at 12:33 am

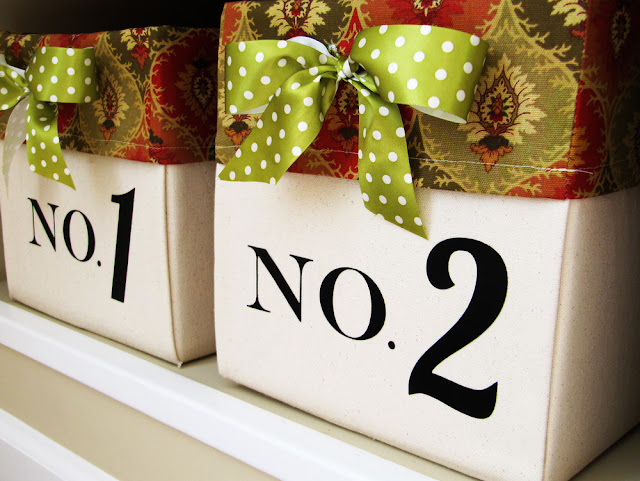
    Really cute & great idea. If you knew me personally you’d know I couldn’t help but lol when I saw the irony in your diaper boxes labeled “No. 1 & No. 2.” But I will be labeling mine the same. lol

  8. The Life Of Faith says

    September 14, 2012 at 7:09 pm

    These are so cute! I pinned them on my Pinterest project board to make in the future:) Following along from Serenity Now Link up!

    http://the-life-of-faith.blogspot.com/

  9. Brooke says

    September 15, 2012 at 1:56 am

    These are adorable!!! And I love the no-sew option!

  10. Richard John Jordan says

    October 26, 2012 at 2:21 am

    This was cute. Personally made and designed storage bin looks awesome. This shows resourcefulness.

  11. Rose Hill says

    November 15, 2012 at 8:45 pm

    Very cool, nice choice of colors. I can get new boxes for free in various sizes, I might just mod podge mine instead since I have plenty of paper on hand which makes the project even cheaper.
    But I will definitely try your scalloped vinyl idea – looks awesome and adds that finishing touch!

  12. Lucy says

    September 7, 2013 at 10:25 pm

    Oh my! I love these boxes! I have to make some of my own!

  13. Jenna says

    October 17, 2013 at 9:58 am

    So cute! I’ve been saving my diaper boxes just for this! Thanks for sharing!

Primary Sidebar

PS Search

Search this website

Seasonal Inspiration

Hocus Pocus Wreath
Ghost Plushies
Paper Pumpkins
Fabric Yo-Yo Pumpkins

Copyright © 2023 · Positively Splendid · All Rights Reserved. · Privacy Policy

Privacy & Cookies: This site uses cookies and other tracking technologies to assist with navigation and your ability to provide feedback, analyse your use of our products and services, assist with our promotional and marketing efforts, and provide content from third parties. To find out more, as well as how to remove or block these, see here: Our Cookie/Privacy Policy