• Skip to primary navigation
  • Skip to main content
  • Skip to primary sidebar

Positively Splendid {Crafts, Sewing, Recipes and Home Decor}

Handcrafted. Splendidly.

  • Home
  • Blog
  • + Handmade
    • Crafts
      • Craft Gift Ideas
      • Holiday Crafts
      • Home Decor Crafts
      • Kids’ Crafts
      • Paper Crafts
      • Quick and Easy Crafts
      • Wearable Crafts
      • Wreaths
    • Gift Ideas
      • Budget-Friendly Gifts
      • Gift Wrapping
      • Gifts for Dads and Grandpas
      • Gifts for Kids
      • Gifts for Men
      • Gifts for Moms and Grandmas
      • Gifts for Neighbors
      • Gifts for Sports Fans
      • Gifts for Teachers
      • Gifts for Women
      • Quick and Easy Gifts
    • Kid-Friendly Projects
    • Sewing
      • Sewing for Children
      • Sewing for Men
      • Sewing for the Home
      • Sewing for Women
      • Sewing Techniques
      • Sewn Accessories
      • Sewn Gifts
  • + Home & Garden
    • DIY Home Decor Projects
    • Helpful Tips
    • Home Decor Crafts
    • DIY
    • Home Tour
    • Mantels and Tablescapes
    • Organization
    • Outdoor and Garden
  • + Holidays & Seasons
    • Spring
    • St. Patrick’s Day
    • Summer
    • Teacher Appreciation
    • Thanksgiving
    • Valentine’s Day
    • Winter
    • Back to School
    • Christmas
    • Easter
    • Fall
    • Fathers’ Day
    • Graduation
    • Halloween
    • Independence Day
    • Mothers’ Day
    • New Year’s
  • + Printables
  • + Recipes
    • Soups and Stews
    • Appetizers and Salads
    • Breads
    • Desserts
    • Food Crafts
    • Main Dish

Outdoor Pillow from a Shopping Bag

July 12, 2012 By Amy @ Positively Splendid

FacebookTweetPinYummlyPrint

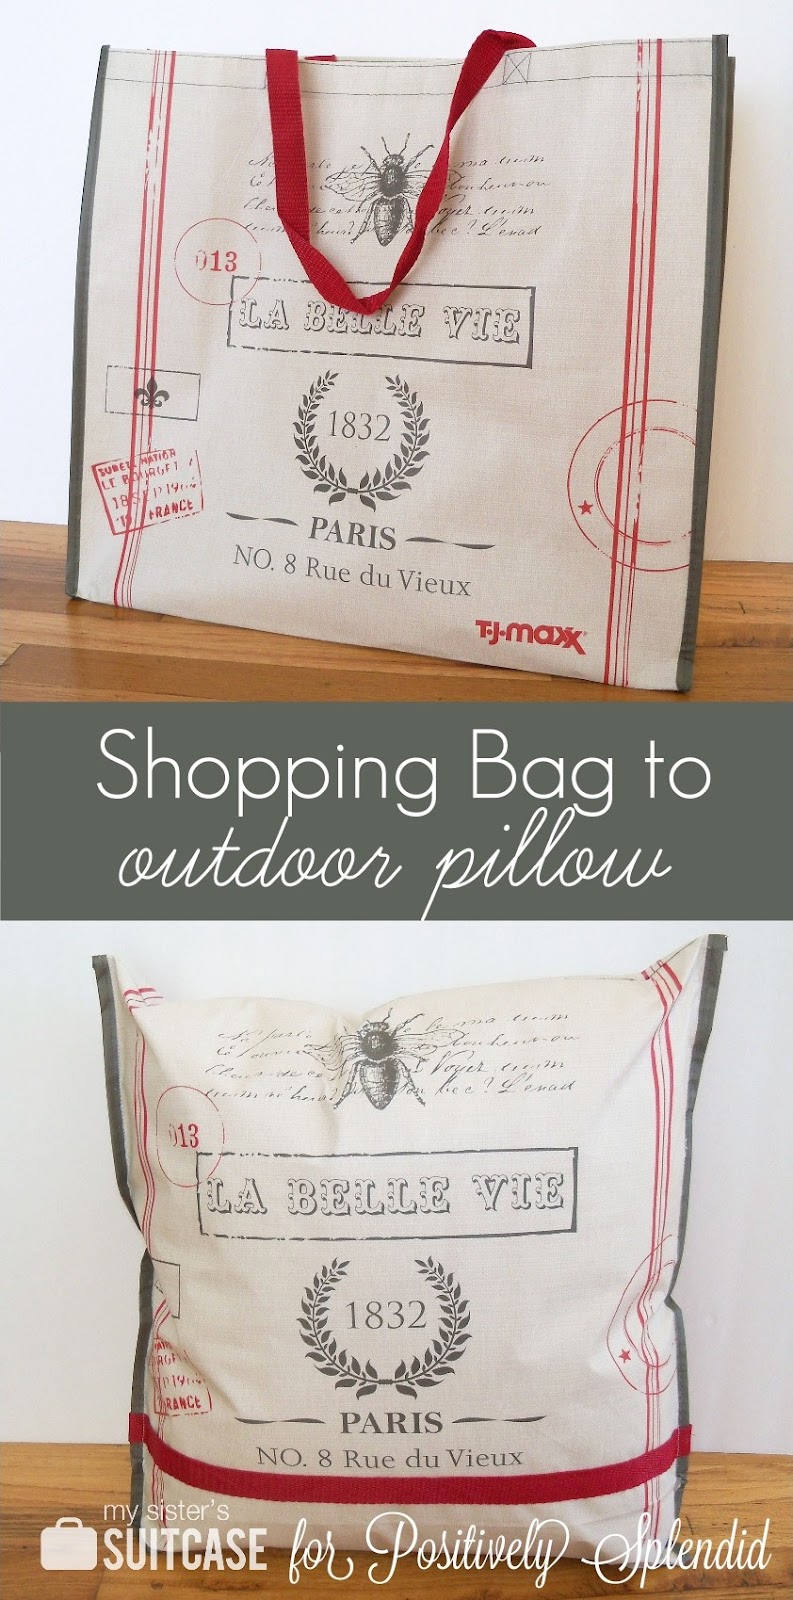
The sweet girls from My Sister’s Suitcase are here again today with a truly ingenious way to punch up your outdoor decor with some weather-proof outdoor pillows. Take it away, Nat and Holly!

*** 
We’re thrilled to be back this month, sharing a fun and easy tutorial with you guys! Every time I shop at TJ Maxx, I always check out their reusable shopping bags to see what new designs they have… on Saturday, I found this one:
I love the design, and I’ve been looking for some outdoor material to add a splash of red to my front patio. Just one problem… that material isn’t cheap! Plus, my kids are always turning on the hose and getting the chairs all wet. So I was a little worried about putting nice pillows out there. When I saw this bag, the lightbulb came on! I could totally turn this bag into an outdoor pillow 🙂 And, the material is virtually waterproof, so it’s perfect!

It was so easy! Here’s what I did first…
Cut both sides of the bag out, leaving the {gray} trim pieces in tact. You’ll be left with this:


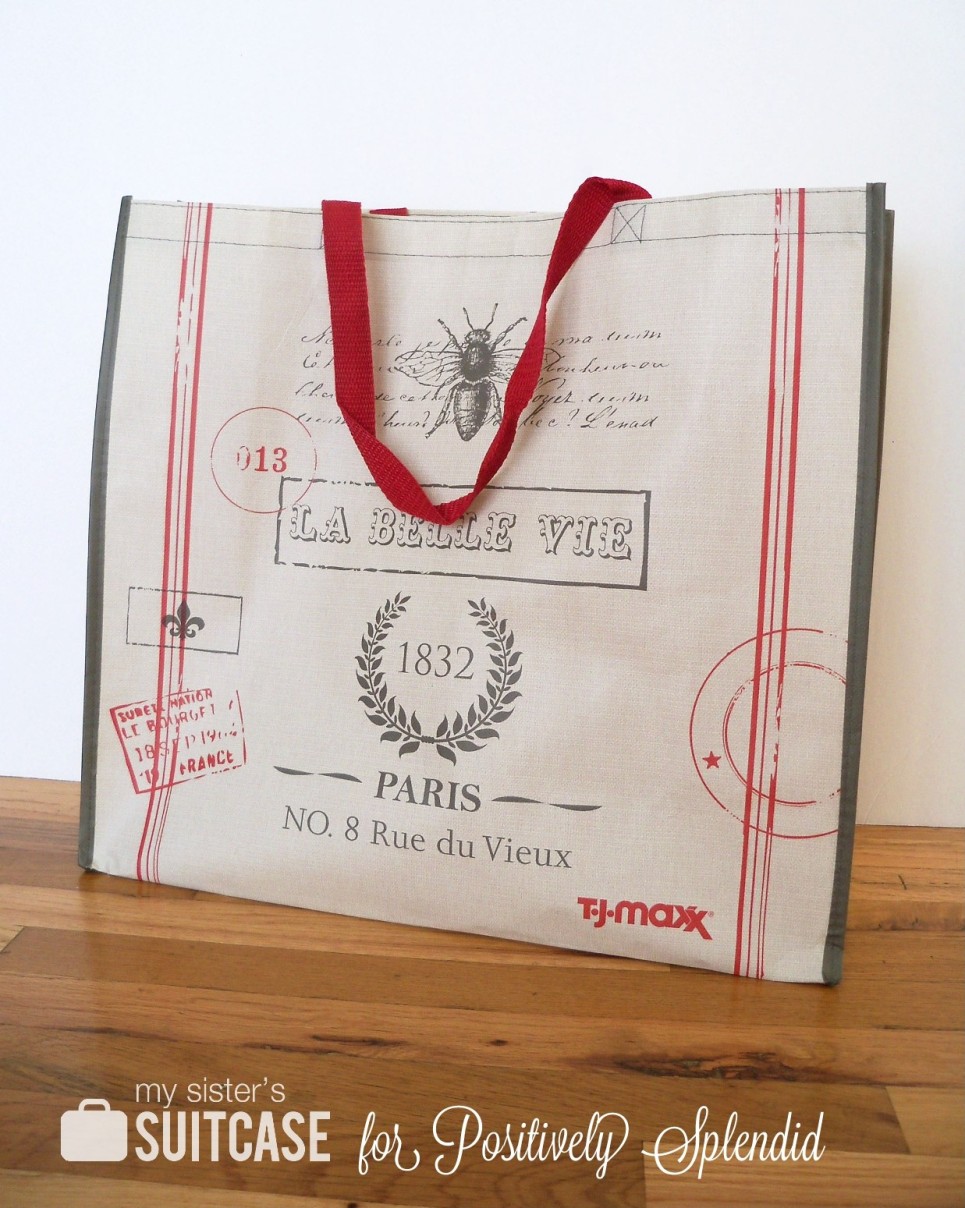
{1} Now, lay out the bag and make sure your pillow insert fits inside. I used a 20″ pillow form and it worked great! {2} Cut the bag handles off, and set aside. {3} It’s already starting to look like your pillow! {4} Now, to cover up that TJ Maxx logo… I decided to use the red handle as a decorative trim piece. It covered it perfectly!

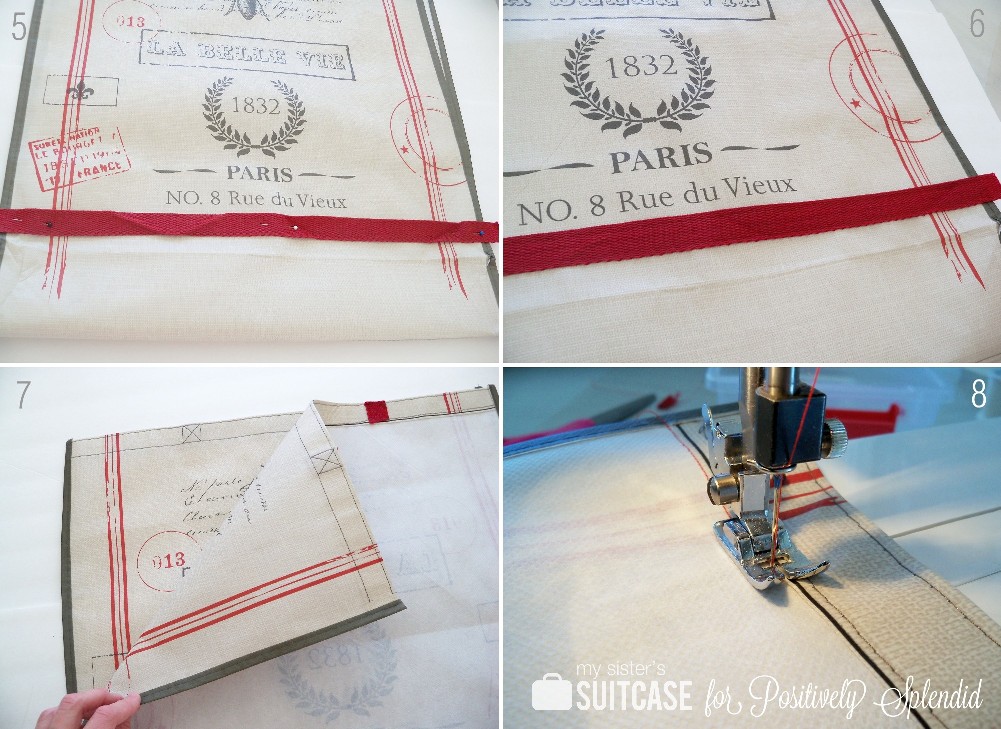
{5} Pin the handle/trim along the front of the bag and {6} sew it on to the bag. Using the same color thread looks best 🙂 {7} Now, fold the bag so the right sides are facing together and {8} sew the top edges together (where the handles were.) I sewed along next to the top seams of the bag so I wouldn’t have to go through all that extra bulk.

{9} Then just trim that excess material off the top. {10} Turn it right sides out, and the top seam of your pillow is done! The bottom seam of your pillow is already complete too because it is the bottom of the bag… you don’t even have to sew anything 🙂 So now we just have the sides to worry about. Well, I absolutely love that gray trim on the sides and I wanted it to show on the final pillow, so I decided to sew those seams on the outside. I sewed up one side completely, then inserted my pillow.

{11} I squished the pillow over to the side as far as I could, and pinned it in the middle to make some more space while I was sewing the final side. When the final seam was done, I fluffed up the pillow and voila! {12} A brand new outdoor pillow for 99 cents! (and the cost of my pillow form which I already had in my closet.) Yes, I do hoard pillows, don’t judge!!

This entire project only took me about 20 minutes {and I was taking pictures all along the way too!}
Here’s the before and after:

A simple way to spruce up your outdoor space:

I absolutely LOVE it!

Thanks for letting us share this project with your readers Amy. If you love reusable shopping bags as much as we do, check out how we made 2 darling aprons with one shopping bag! We’ll see you again next month!

***

Nat and Holly are two sisters who share a love of all things creative. Currently living 462 miles apart, their blog, My Sister’s Suitcase, gives them a place to share their ideas {and an excuse for lots of late-night phone calls!} They hope to inspire you with holiday and home decor, easy DIY projects, and creative upcycling. They also have lots of simple kids activities, free printables, and inexpensive gift ideas. They would love for you to join them in their LDCR {long-distance crafting relationship!}

Amy @ Positively Splendid

Having grown up in a home brimming with sewing notions and paintbrushes, Amy has a deep love for all things creative. On any given day, you’ll find her knee-deep in her latest creative endeavor, with projects ranging from sewing and crafts to home decor and kid-friendly ideas. Amy believes that everyone, regardless of skill level or experience, possesses the ability to create something beautiful, and Positively Splendid was born of her passion for helping others harness their innate creative potential.

EVEN MORE GREAT IDEAS JUST FOR YOU!

FacebookTweetPinYummlyPrint

Filed Under: Crafts, Home Decor Crafts, Sewing, Sewing for the Home, Tutorials Tagged With: Outdoor decor, Upcycling

Previous Post: « Vibrant Kitchen Update
Next Post: Flor Giveaway! »

Reader Interactions

Comments

  1. Holly @ abakershouse.com says

    July 12, 2012 at 2:11 pm

    Yes, what a great idea! I will now look at shopping bags with a new creative mindset– thanks!

  2. Carolyn says

    July 12, 2012 at 2:38 pm

    What a beautiful brilliant idea!

  3. Bonnie and Trish @ Uncommon says

    July 12, 2012 at 2:50 pm

    SUPER CLEVER!!! So many possibilities!! 😉

  4. Sarah-Lyn says

    July 12, 2012 at 3:27 pm

    What!? That’s an AWESOME idea, gotta pin this one lol 😉

    SL

  5. Sue says

    July 12, 2012 at 3:40 pm

    What a great idea! Cute bag, and even cuter pillow!

  6. Jeannine says

    July 12, 2012 at 3:45 pm

    I love this idea! It’s genius!! Thanks for sharing.

    Jeannine @ The Concrete Cottage

  7. {northern cottage} says

    July 12, 2012 at 7:09 pm

    what fun!!! awesome share!

  8. Shelly @A Creative Space says

    July 12, 2012 at 7:46 pm

    Brilliant! Cute, Cute, Cute, Cute, Cute!

  9. Kathy says

    July 12, 2012 at 9:54 pm

    What an awesome transformation….& how very clever! I’m off to TJM tomorrow in hopes of scoring one of these cute bags! Thanks for sharing the tutorial…Blessings!

  10. Karri Reiser says

    July 13, 2012 at 5:34 am

    Beautiful, Each year I buy the bag Barnes and Noble has around Mother’s Day. I now have more then I really need, making some into pillows would be perfect.

  11. Seaweed and Raine says

    July 13, 2012 at 11:38 am

    That’s a fab bag to start with… and turning it into a pillow is inspired. Just curious – is the bag made out of plastic covered fabric? (No TJM here in Australia).

  12. Jennifer says

    July 14, 2012 at 1:49 am

    Brilliant! Those girls are fabulous!!

  13. Chase the Star says

    July 15, 2012 at 6:11 am

    This is brilliant! I’m going to stop by TJ Maxx tomorrow!
    Barbara at Chase the Star
    http://chase-thestar.blogspot.com

  14. Bobbi says

    July 15, 2012 at 4:22 pm

    LOVE this idea!!! Thx for sharing.

  15. Celeste B. says

    July 16, 2012 at 11:33 am

    Such a great idea! Did you just use a regular needle and thread? Nothing special?

  16. Doreen says

    July 16, 2012 at 3:15 pm

    Love the bag-turned pillow! Since our spring visit to Paris, I cannot get enough Parisian-inspired creativity! I’m off to TJ Maxx now! And pinning this!

  17. Athena says

    July 16, 2012 at 7:46 pm

    Love this idea, and I have that same bag..lol. I am definitely going to pin this for future use.

  18. Max Green says

    July 19, 2012 at 4:23 pm

    This is such an innovative idea. I am a firm believer in recycling, so this is right up my alley! Plus, if this only took you 20 minutes, then I’ve got to give it a try! Between keeping up with my job at Dish and the family, I never have time to go shopping for pillows. I appreciate how you gave instructions and pictures too! It’s so frustrating when blogs only show the finished products, especially for a person like me that is dependent on instructions. I messed up scrambling an egg one time because my mom forgot to tell me to grease the pan; yeah, I’m that helpless. LOL! I usually have to get all my project ideas off DIY Network just so I can record and play back the show to follow along at home. Luckily, I have the Hopper DVR with a huge amount of recording space because there are so many cute projects out there! I’m definitely going to try this one ASAP, since I want to enjoy it while it’s still nice and warm outside. Wish me luck!

  19. jjflamingo says

    July 27, 2012 at 11:59 am

    Iam so excited to find this! The handle on my favorite shopping bag broke the other day, and I debated on whether to fix it or not (obviously the groceries were too heavy, so I thought it might just break again in the future). This pillow will be wonderful! I can just picture it sitting outside my front door on my glider! Thanks for the idea and tutorial

  20. Katie says

    August 8, 2012 at 3:16 pm

    What a unique idea! So many possibilities out their!

  21. ConnieF says

    April 14, 2013 at 12:07 am

    I’ve also used these shopping bags as fabric for other handbags-they’re such a colorful, strong fabric and quite inexpensive. I’ve cut them apart and then cut the new bag pattern out of them, sewed it together-Viola! A new upcycled, strong, water resistent bag!

    • Amy @ Positively Splendid says

      April 15, 2013 at 7:42 am

      Such a great idea, Connie! Thanks for sharing.

Primary Sidebar

PS Search

Search this website

Seasonal Inspiration

Hocus Pocus Wreath
Ghost Plushies
Paper Pumpkins
Fabric Yo-Yo Pumpkins

Copyright © 2025 · Positively Splendid · All Rights Reserved. · Privacy Policy

Privacy & Cookies: This site uses cookies and other tracking technologies to assist with navigation and your ability to provide feedback, analyse your use of our products and services, assist with our promotional and marketing efforts, and provide content from third parties. To find out more, as well as how to remove or block these, see here: Our Cookie/Privacy Policy