Think it’s impossible to paint outdated laminate furniture? Think again! With the right supplies, you can transform an old laminate piece into something to be proud of. Read on for the details!
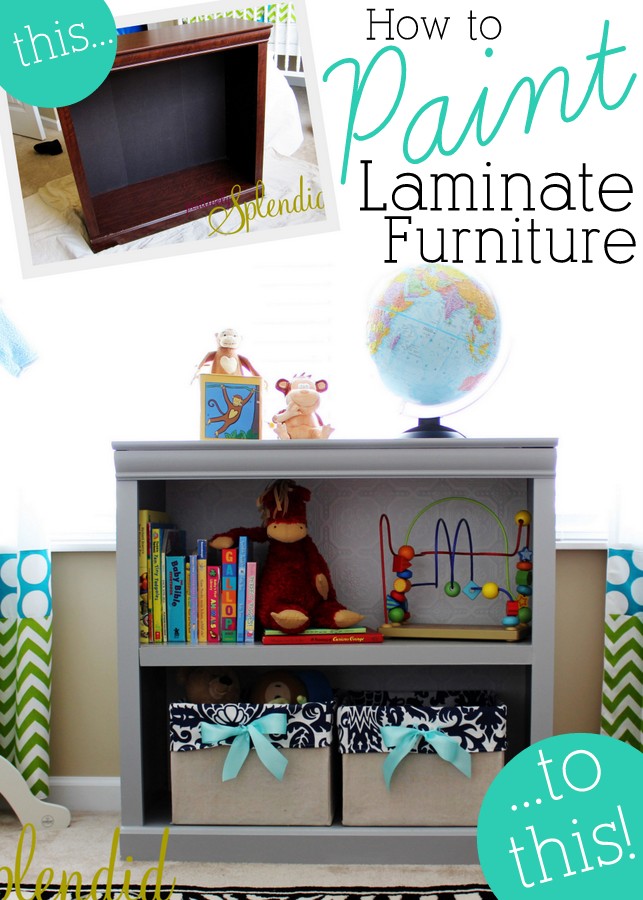
Just after Matt and I married, we bought this little laminate bookshelf from Tarjay for our bedroom. A vision, no? I especially love the fact that we nailed the back cardboard piece on backward, so the faux woodgrain loveliness actually faced the back of the shelf instead of the front as intended. 😉

In planning George’s nursery, I made it a goal to purchase as few new items as possible, instead repurposing items we already owned. This bookshelf was languishing in our garage, and as it turned out, it was just the right size and height for the space. The dark cherry color, though, just wasn’t working for me. I turned to Kate from Centsational Girl for some tips on how to paint laminate furniture, and I set to work recreating the piece!
I followed Kate’s procedure to the letter, starting off with a coat of oil-based Zinsser bond-coat primer. I didn’t have to sand this piece a single solitary bit before priming! After priming, I gave the piece a light sanding before I applied two coats of Benjamin Moore Natura paint in San Antonio Gray (the same color I used for the antique dresser I dressed up for the space). To protect everything after the paint had dried completely, I applied a coat of polyacrylic. This is admittedly a lot of steps, but the finished result is well worth it!

I encountered a slight problem, though, as I was painting. It dawned on me that the moisture in the paint would cause the cardboard backing to warp miserably. Being immensely pregnant and eager to have the project done, I didn’t want to have to replace the backing with something more substantial. What to do?

Y’all might remember the faux hammered copper panels I crafted for our game cabinet using paintable wallpaper. I had plenty of the paper left over from that project, so I decided to put it to use here.
I measured the back of my shelf and cut two pieces of the paper to fit those dimensions. (The roll of paper wasn’t wide enough to allow me to use a single piece to cover the entire back in one fell swoop.) A rotary cutter and mat made this step particularly easy!

Instead of soaking the paper to activate the glue before affixing it to the back of the shelf (once again, I was concerned about what the moisture would do to the cardboard), I adhered the paper using double-sided carpet tape.


When figuring the dimensions for my paper, I made sure the seam between the two pieces would ultimately be concealed behind the shelf. I also made sure that the pattern on the top piece would be precisely aligned with the pattern on the bottom piece. I decided to leave my paper white, as the color was just right for the space, but you can spray paint your trimmed pieces before the carpet tape step if you want some added color.


I made a set of storage bins for the shelf using my diaper box canvas bin tutorial.


Having grown up in a home brimming with sewing notions and paintbrushes, Amy has a deep love for all things creative. On any given day, you’ll find her knee-deep in her latest creative endeavor, with projects ranging from sewing and crafts to home decor and kid-friendly ideas. Amy believes that everyone, regardless of skill level or experience, possesses the ability to create something beautiful, and Positively Splendid was born of her passion for helping others harness their innate creative potential.
It looks lovely!
Looks beautiful !!! I has a small laminate bookcase that is looking so sad. Thanks for the tips and the link.
Looks great! I love that you thought to use the patterned paper for the backing! I wouldn’t have thought of the warping. :s Brilliant!
Very cute! I have lots of laminate, I’ll have to use the tutorial!
Just darling, Amy. Love the idea of using the carpet tape – genius!! Going to look up your covered diaper box tutorial……..I’m thinking of using this one. Happy 2012!!
Love!!
This is a great transformation Amy!!! I have a laminate dresser in my classroom that could use a facelift… May have to try this! Tell me more about the curtains in this room please!!!
Amy, you always have such great style and ideas! I just came back from a week at my niece’s to create her little girls room that is due next month. We had some inexpensive shelves that we wanted to do some work on also. We covered the back with black and white polka dotted Christmas wrapping paper. I have posted all the projects but go check out what I did with fabric on the wall. And I am totally copping the diaper recycle boxes! http://ms-smartie-pants.blogspot.com/2012/01/beginning-of-baby-girl-nursery.html
Looks great! I have an old bookshelf like this in my daughter’s nursery. Maybe I’ll have to fix it up a bit. Thanks!
Where’d you get that cute zebra rug?
What a fantastic makeover! Love the wall paper background! ~Jen @ http://www.icantstopcrafting.blogspot.com
Smart call on the background. I also have that paintable wall paper and I love it! Awesome!
~Kristi @ http://www.momvsdesignschool.blogspot.com
Okay this is adorable! I’m pinning it right now. Glad to find you from the Oopsey Daisy link up!
wow!!! what an awesome make-over! love this in your baby’s adorable room. your drapes are so pretty too!
Beautiful!
Amy! I love this entire nook! What a cute and cozy space.
Have a great weekend!
Kerry at HouseTalkN
So cute! I’m actually in the process of figuring out toy storage for my two children as they were extremely spoiled this Christmas. This is a step toward what I’m looking for, so that’s for the inspiration! :o)
Wow! Love how this turned out! I need to re-do so many old junky pieces from early marriage:) Bookmarking this!
Amanda
beautifully perfect! visiting from serenity now!
Great transformation! The paper on the back was so smart! I’m going to remember that for future use!
I love love the paper inside… SO pretty!!!
Adorable!! I love the gray color and the paper backing is the perfect amount of depth! Who knew you could make laminate look so great? 🙂 Visiting from Serenity Now, what a lovely blog you have, Amy!
It is fabulous. What an amazing transformation. Love the diaper box transformation, too.
Ruth
Love it with the texture from the wall paper. I didn’t realize you could successfully paint laminate! i am so excited to try it!
That really did turn out amazing! I have a laminate desk that I was going to give to the D.I., but now that I know it can be painted, I think I might keep it!
I just drug an old bookcase out to my garage and spray painted it but yours is so much cuter! I love it!!