• Skip to primary navigation
  • Skip to main content
  • Skip to primary sidebar

Positively Splendid {Crafts, Sewing, Recipes and Home Decor}

Handcrafted. Splendidly.

  • Home
  • Blog
  • + Handmade
    • Crafts
      • Craft Gift Ideas
      • Holiday Crafts
      • Home Decor Crafts
      • Kids’ Crafts
      • Paper Crafts
      • Quick and Easy Crafts
      • Wearable Crafts
      • Wreaths
    • Gift Ideas
      • Budget-Friendly Gifts
      • Gift Wrapping
      • Gifts for Dads and Grandpas
      • Gifts for Kids
      • Gifts for Men
      • Gifts for Moms and Grandmas
      • Gifts for Neighbors
      • Gifts for Sports Fans
      • Gifts for Teachers
      • Gifts for Women
      • Quick and Easy Gifts
    • Kid-Friendly Projects
    • Sewing
      • Sewing for Children
      • Sewing for Men
      • Sewing for the Home
      • Sewing for Women
      • Sewing Techniques
      • Sewn Accessories
      • Sewn Gifts
  • + Home & Garden
    • DIY Home Decor Projects
    • Helpful Tips
    • Home Decor Crafts
    • DIY
    • Home Tour
    • Mantels and Tablescapes
    • Organization
    • Outdoor and Garden
  • + Holidays & Seasons
    • Spring
    • St. Patrick’s Day
    • Summer
    • Teacher Appreciation
    • Thanksgiving
    • Valentine’s Day
    • Winter
    • Back to School
    • Christmas
    • Easter
    • Fall
    • Fathers’ Day
    • Graduation
    • Halloween
    • Independence Day
    • Mothers’ Day
    • New Year’s
  • + Printables
  • + Recipes
    • Soups and Stews
    • Appetizers and Salads
    • Breads
    • Desserts
    • Food Crafts
    • Main Dish

Chalkboard Picket Fence Pallet Tutorial

March 2, 2012 By Amy @ Positively Splendid

FacebookTweetPinYummlyPrint

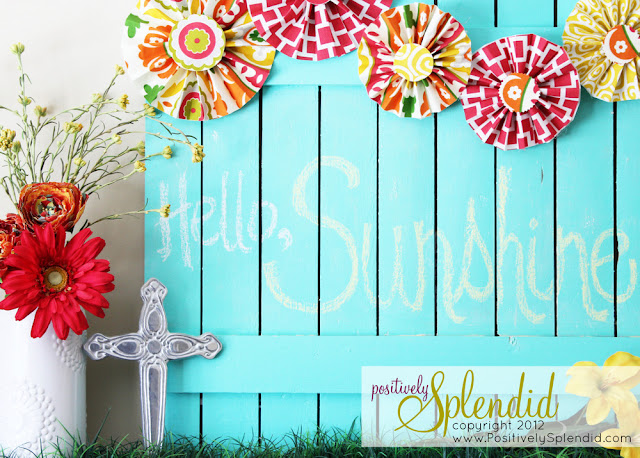
The moment I switch my calendar to March, I automatically shift into spring mode. All this week, I’ve been sharing the details of my spring mantel, which represents my first springtime project of the year. Without a doubt, the star of the display is my vibrant turquoise chalkboard picket fence pallet. 

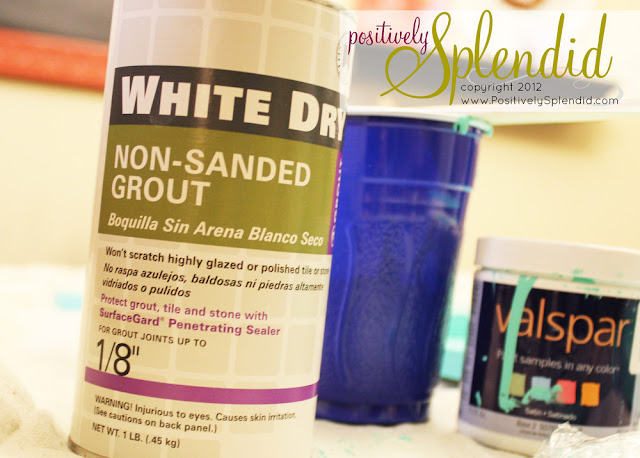
I shared a few weeks ago the method I used for making custom-colored chalkboard paint to create a rust-colored chalkboard for my new hallway command center. I had plenty of tile grout left over from that project, so I opted to use more of it here by painting the center section of the pallet with chalk paint to enable me the the flexibility to change out the sentiment of the pallet easily. Right now, the pallet has a springtime message, but I’ll be able to switch it to an Easter theme in a couple of weeks. I love this feature!

Today I’m going to share how I built my pallet. By using pickets easily found at any home improvement store and just a couple of additional supplies, I think you’ll be impressed with what a genuinely easy project this is!

For this project, you will need…
(11) 3.25″ wide and 48″ long wood fence pickets
Pencil
Wood glue 
Finishing nails and hammer
Primer
Paint (I found a half-pint sample of Valspar paint from Lowe’s [Simply Aqua] to be just the right amount for this project)
Unsanded tile grout
Chalk

one.
To begin, trim down your pickets (or have the kind folks at your home improvement store do so for you), using the following dimensions:
9 pickets trimmed to 36″, preserving the decorative (pointed) ends
2 pickets trimmed to 31″, discarding the decorative (pointed) ends

two.
Lay your 9 pointed picket pieces in a row on a flat surface, spacing them just shy of 1/4″ apart. Now, lay your 2 straight (31″) pieces crosswise on top of these pieces, as shown. The top edge of my upper cross-piece was 10″ from the top edge of the vertical pickets and the bottom edge of the lower cross-piece was 5.5″ from the bottom edge of the vertical pieces.

Now, use a pencil to trace above and below the line of your horizontal cross-pieces to use as a guide as you glue your pieces in place.

three.
Apply a small amount of glue within these lines, as shown, and use the adhesive to adhere your cross-pieces on top of your vertical picket pieces.

four.
Allow the glue to dry slightly, and then use finishing nails to secure the board together. I used two nails per vertical picket section along the top and bottom edge of the cross-piece. (These finishing nails will compensate for any warps in your pickets that prevent the glue from adhering thoroughly.)

Whew – the construction portion of the project is complete!
five.
Now, apply a coat of primer to your pallet, and allow it to dry completely before applying 1-2 coats of paint. Let everything dry thoroughly.
six.
Once your pallet is dry, place 1 tablespoon of tile grout in a plastic cup, and use a stir stick to carefully break up and clumps in the grout. Now, add 1/2 cup of paint to the cup, and use your stir stick to mix thoroughly. Apply this chalk paint to the section in the middle of your pallet between the two horizontal pieces, making sure the entire surface of this section is thoroughly covered with the paint. (You will most likely need at least 2 coats of the chalk paint.) If you run out of the chalk paint as you work, make more of the paint/grout mixture, 1/2 cup at a time.

seven.
Once your paint has thoroughly dried, season the chalkboard portion of the pallet by rubbing a piece of chalk over the entirety of its surface and then gently wiping it away with a barely-wet piece of cloth.
All finished!

This pallet would also make a really fun photo backdrop, and I think it would be the perfect way to punch up front porch decor. What a fun way to greet guests with a personalized chalk message!

Project Notes

  • You can use this same basic method for creating a pallet with conventional, straight pieces of wood, too.
  • I opted to lean my pallet against the wall to display it instead of hanging it directly on the wall, but you could also add hangers to the back to display it if you prefer.
  • Sidewalk chalk is perfect for both seasoning and writing on your board.


If you enjoyed this post, I would love for you to post it to Pinterest! Do so easily by clicking the link below.

Pin It


Be sure to also check out the tutorial for how I created the No-Sew Fabric Medallions for this display!

Happy Friday, my friends! 

Photobucket

Amy @ Positively Splendid

Having grown up in a home brimming with sewing notions and paintbrushes, Amy has a deep love for all things creative. On any given day, you’ll find her knee-deep in her latest creative endeavor, with projects ranging from sewing and crafts to home decor and kid-friendly ideas. Amy believes that everyone, regardless of skill level or experience, possesses the ability to create something beautiful, and Positively Splendid was born of her passion for helping others harness their innate creative potential.

EVEN MORE GREAT IDEAS JUST FOR YOU!

FacebookTweetPinYummlyPrint

Filed Under: Crafts, DIY, Home Decor Crafts, Home Decor Crafts, Positively Home & Garden, Positively Seasons, Spring, Tutorials Tagged With: Mantel Decor, Pallet Art, Spring, Wall Decor

Previous Post: « Packrat
Next Post: Saturday Seven Spotlight »

Reader Interactions

Comments

  1. Trish says

    March 2, 2012 at 2:16 pm

    I am in LOVE with this project. I might need to go get all the materials and start on my own tonight 🙂

  2. claudia b says

    March 2, 2012 at 3:23 pm

    OMG I so need to do this – I want a picket fence on our front yard but it’s not high on the list, but THIS I can totally do, and the turquoise, I love it!!!

  3. Abbey D. says

    March 2, 2012 at 3:25 pm

    This idea is wonderful. I think your blog is my go to blog for “bright and happy” ideas. You always use such amazing pops of color and all your ideas are so well executed. Love it!

  4. Kellie says

    March 2, 2012 at 3:56 pm

    You are just so clever. I always wait in anticipation for what type of project you’ll post next. Great job and many thanks for sharing 🙂

  5. Leanne says

    March 2, 2012 at 5:10 pm

    What a sweet mantel. So bright and cheerful. I love it! Have a great weekend!

  6. Mandy says

    March 2, 2012 at 5:14 pm

    SOOOO cute!!!!

  7. Beverly {Flamingo Toes} says

    March 2, 2012 at 5:54 pm

    Love this so much Amy!! The picket fence is darling and thanks for the chalk paint recipe! I’ve been wanting to do this!

  8. Heidi @ Decor & More says

    March 2, 2012 at 8:15 pm

    Love this cheery project, Amy!! Thanks for sharing ~ love how easy peasy it is!
    xo Heidi

  9. Sue says

    March 2, 2012 at 11:35 pm

    So cute and I LOVE the color! Pinned!

  10. Sugarr2518 says

    March 3, 2012 at 1:10 am

    I love the fence!! It is really just so cute:) The color is just so bright and cheery!

  11. Michelle says

    March 3, 2012 at 7:31 am

    Oh my Amy!! This is fabulous, love how bright and cheery this is, the colour is perfect the whole thing is perfect for spring.

  12. Courtney says

    March 3, 2012 at 6:10 pm

    I’m with Abbey D. PS is definitely my go-to blog for bright and happy too! I just shared this project with hubs and he loves it just as much as I do!

  13. kristaf says

    March 21, 2012 at 7:07 pm

    So gorgeous! I’m trying to recreate this as a prop for my daughters 6 month pictures. I used a magnetic primer and made the flowers magnets. You will definitely be getting all the credit when I post the finished product!!

  14. Copycat Queen says

    April 2, 2012 at 1:25 pm

    I love this project so much and want to make it as a backdrop for a couple of parties coming up but I’ve been ALL over town and can’t find these pickets anywhere. I wonder if they’re only available in certain parts of the country? None at Home Depot, Lowes or a independently owned lumber store. So sad 🙁

  15. kristaf says

    April 19, 2012 at 9:54 pm

    Here’s a link to my copy cat version of your gorgeous creation! Thank you so much for this amazing project!

    http://thecraftynavywife.blogspot.com/2012/04/magnetic-chalboard-pocket-fence.html

  16. Britni@Hubby Made Me says

    May 18, 2012 at 8:04 pm

    I love this!! The colors are amazing! It’s officially on my list of future projects 🙂

  17. Mark says

    July 19, 2013 at 3:09 pm

    Love this, thanks for posting Amy! Pinned it to our Handmade Home Decor board.

    • Amy @ Positively Splendid says

      July 20, 2013 at 9:12 am

      Thank you, Mark!

Primary Sidebar

PS Search

Search this website

Seasonal Inspiration

Hocus Pocus Wreath
Ghost Plushies
Paper Pumpkins
Fabric Yo-Yo Pumpkins

Copyright © 2025 · Positively Splendid · All Rights Reserved. · Privacy Policy

Privacy & Cookies: This site uses cookies and other tracking technologies to assist with navigation and your ability to provide feedback, analyse your use of our products and services, assist with our promotional and marketing efforts, and provide content from third parties. To find out more, as well as how to remove or block these, see here: Our Cookie/Privacy Policy