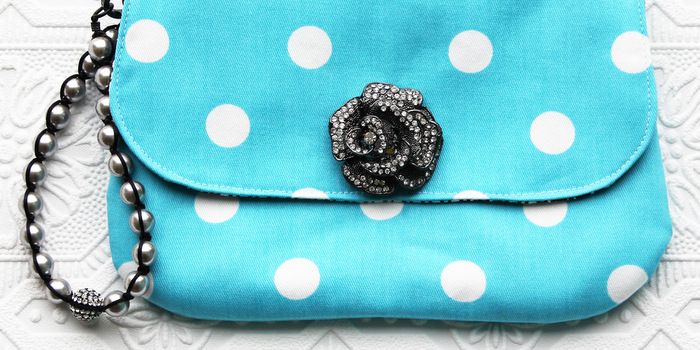
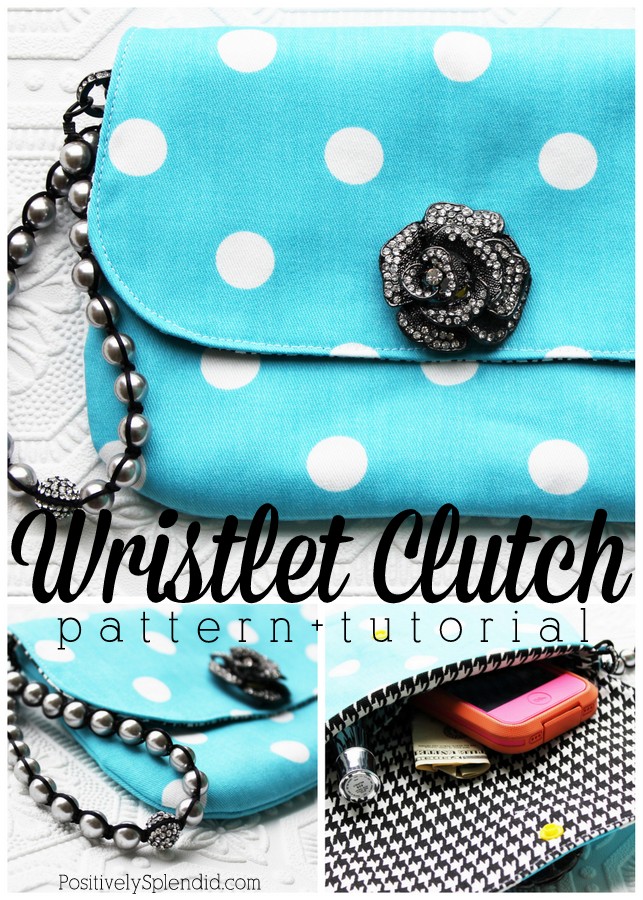
Accessories truly can make an outfit, and this simple clutch-style handbag is no exception. This wristlet clutch handbag can easily be completed in the span of an afternoon, and it is the perfect way to use up scraps of fabric you might have on hand. When you see how easily these come together, you’ll want to using this free purse sewing pattern to make a clutch to coordinate with every outfit! Let me show you how it’s done.
For this project, you will need…
- Elegant Wristlet Clutch Pattern Pieces (free download)
- Fabric in two coordinating patterns (fat quarters or fabric scraps work great)
- Fusible fleece
- Coordinating thread
- Washable ink marker
- Nylon cording or narrow ribbon
- Snaps and snap-setting tool
- Short necklace, for the wristlet (I used a necklace bottom from the Noir line from Styled by Tori Spelling)
- Decorative brooch (mine is from Styled by Tori Spelling)
- Basic sewing supplies: machine, shears, etc.
- From the Body Pattern Piece (A): 2 pieces cut from the main (outer) fabric, 2 pieces cut from the lining fabric, 2 pieces cut from fusible fleece
- From the Pocket Pattern Piece (B): 2 pieces cut from the lining fabric
- From the Flap Closure Pattern Piece (C): 1 piece cut from the main (outer) fabric, 1 piece cut from the lining fabric, 1 piece cut from fusible fleece


Turn the stitched piece right-side out; press. Topstitch 1/8″ from the seamed edge. Set this completed flap closure piece aside for now.

Place the two pocket pieces together, right sides facing, and pin along their top (straight) edges, as shown. Stitch 1/4″ from the pinned edge. Press the seam open, and then fold the piece over at the seam, so that the right sides face outward. Press piece flat. Topstitch 1/8″ from the folded edge.

Measure in 4.25″ from the topstitched edge of the pocket; mark with a washable ink marker. Using a ruler, draw a line through this mark to bisect the pocket into sections. Pin the pocket piece face up on top of one of the body lining pieces, as shown. Stitch along the line you just drew to secure the pocket to the lining piece.

Place the remaining body lining piece face down on top of the stitched lining/pocket piece, so that the right sides of each piece are facing. Pin. Use a washable ink marker to make two marks along the bottom edge of the pieces that are 3″ apart, as shown. Leaving the top (straight) edge unstitched, use a 1/4″ seam allowance to stitch around the lower edges of the pinned pieces, making sure to leave the 3″ space between the two marks unstitched. (You will use this opening to turn the clutch right-side out in a later step.) Set this piece aside.

Place the outer body pieces (the ones that are fused with fleece) together, right sides facing; pin. Leaving the top (straight) edge unstitched, use a 1/4″ seam allowance to stitch from the upper right-hand corner around and back up to the upper left-hand corner. Turn the piece right-side out; press.
Pin the flap closure piece on top of the assembled outer body section, so that the right side of the flap closure is facing the right side of the body. Pin. Baste the flap closure piece to the body piece by stitching a scant 1/8″ from the pinned edge.

Cut a section of nylon cording that is 3″ long. Fold it in a loop, and baste it to the top edge of the body piece, right at the side seam and just beyond the edge of the flap closure. Note: If you are right-handed, you will place your loop on the left side of the piece; if you are left-handed, place it on the right side.

Slip the assembled outer body piece down inside of the assembled lining body piece, as shown, so that the right sides of each section are facing and the side seams and top edges are all aligned. Pin. Note: Assemble the two sections so that the flap closure and the pocket side of the lining section are on the same side.

Stitch all the way around the top of the pinned edges using a 1/4″ seam allowance. Turn the clutch right-side out through the hole you left in the lining in the previous step. Stitch the opening closed, either with your machine, or by hand, if you prefer the stitching to be hidden. (I did it by machine to save time, since I knew the stitching would be hidden inside the bag.)
Apply a snap closure to the bag, so that the stud portion of the snap is on the flap piece and the socket portion is on the body of the bag. (If desired, you can alternatively create a button closure for the bag.)
Now, let’s accessorize! I used a necklace bottom and a pendant from Styled by Tori Spelling to really add some pizzazz. I handstitched the pendant to the front of the bag to conceal the snap on the flap closure…

…and I used a connecting piece to attach the necklace bottom to the loop on the side of the bag. I love that attaching it with the connector gives me flexibility to switch this out later on for a completely different look!

All finished!

The added touch of the jewelry pieces really makes this little bag shine!


Open the bag up…

…and there is just enough room for essentials like a phone, credit cards, cash and a tube of lipstick. Plus, the pocket inside keeps everything nice and organized!

Thanks so much for making PS a part of your day!
This is a sponsored post written by me on behalf of Styled by Tori Spelling and Darice. Rest assured that all opinions expressed in this post are entirely my own, and I am committed to sharing only products I feel my readers will benefit from and enjoy.
Having grown up in a home brimming with sewing notions and paintbrushes, Amy has a deep love for all things creative. On any given day, you’ll find her knee-deep in her latest creative endeavor, with projects ranging from sewing and crafts to home decor and kid-friendly ideas. Amy believes that everyone, regardless of skill level or experience, possesses the ability to create something beautiful, and Positively Splendid was born of her passion for helping others harness their innate creative potential.
This is absolutely too cute!! I wish I could sew 🙁 I really need to learn. Thanks for sharing the tutorial 🙂
Hi Crystal.
there’s a place where you can buy some lessons in order to lear how to sew. It’s called
http://www.youcanmakeit.com
Give a try and join us in doing things that can make you feel satisfied with yourself. Happy sewing.
It looks a bit intimidating…..but I think I am going to give it a try! Thanks.
Don’t be intimidated, Deandra! You’ll do great. Let me know if you have any questions along the way.
i’m 11 and i think will give a go.
I think this will be a perfect project for you, Olivia! Have fun!
love it. looks really easy
This is utterly adorable. I’m kinda like the previous poster – looks a bit over my sewing skills, but to fabulous not to try. Thanks for sharing. It’s a winner!
Dear Amy
I’m planning to make your beautiful purse. I printed out the pattern download on 100% but it looks very small. Could you give me an idea of the finished dimensions of the purse, so I can increase the print percentage if necessary? Sorry to be a bore.
Lizzie
Thank you for this great sewing pattern. I made the clutch purse yesterday and I am so
pleased with the result. I will be making many more of these. To anyone who has just
begun sewing. I bought my sewing machine 6 weeks ago and I have never sewn before.
It is so much fun and very rewarding.
Jill, I am so glad you had such success with this pattern! Thanks so much for stopping by to share.
Hi!
The pattern for download just does not have the pieces drawn…
Was it erased???
I would like to make it…
Thank you!
Hi, Helena! I am unsure of why the pattern download was acting like that. I’ve made the pieces available in a different format this time, and it appears to have solved things from my end. Does everything come through for you now? If not, let me know!
Hi Amy!
Now the pattern is all right! I have dowloaded it and has the all pieces!!
Thank you so much!!!
kisses from Portugal!