• Skip to primary navigation
  • Skip to main content
  • Skip to primary sidebar

Positively Splendid {Crafts, Sewing, Recipes and Home Decor}

Handcrafted. Splendidly.

  • Home
  • Blog
  • + Handmade
    • Crafts
      • Craft Gift Ideas
      • Holiday Crafts
      • Home Decor Crafts
      • Kids’ Crafts
      • Paper Crafts
      • Quick and Easy Crafts
      • Wearable Crafts
      • Wreaths
    • Gift Ideas
      • Budget-Friendly Gifts
      • Gift Wrapping
      • Gifts for Dads and Grandpas
      • Gifts for Kids
      • Gifts for Men
      • Gifts for Moms and Grandmas
      • Gifts for Neighbors
      • Gifts for Sports Fans
      • Gifts for Teachers
      • Gifts for Women
      • Quick and Easy Gifts
    • Kid-Friendly Projects
    • Sewing
      • Sewing for Children
      • Sewing for Men
      • Sewing for the Home
      • Sewing for Women
      • Sewing Techniques
      • Sewn Accessories
      • Sewn Gifts
  • + Home & Garden
    • DIY Home Decor Projects
    • Helpful Tips
    • Home Decor Crafts
    • DIY
    • Home Tour
    • Mantels and Tablescapes
    • Organization
    • Outdoor and Garden
  • + Holidays & Seasons
    • Spring
    • St. Patrick’s Day
    • Summer
    • Teacher Appreciation
    • Thanksgiving
    • Valentine’s Day
    • Winter
    • Back to School
    • Christmas
    • Easter
    • Fall
    • Fathers’ Day
    • Graduation
    • Halloween
    • Independence Day
    • Mothers’ Day
    • New Year’s
  • + Printables
  • + Recipes
    • Soups and Stews
    • Appetizers and Salads
    • Breads
    • Desserts
    • Food Crafts
    • Main Dish

Pinwheel Placemat Tutorial

August 8, 2011 By Amy @ Positively Splendid

FacebookTweetPinYummlyPrint

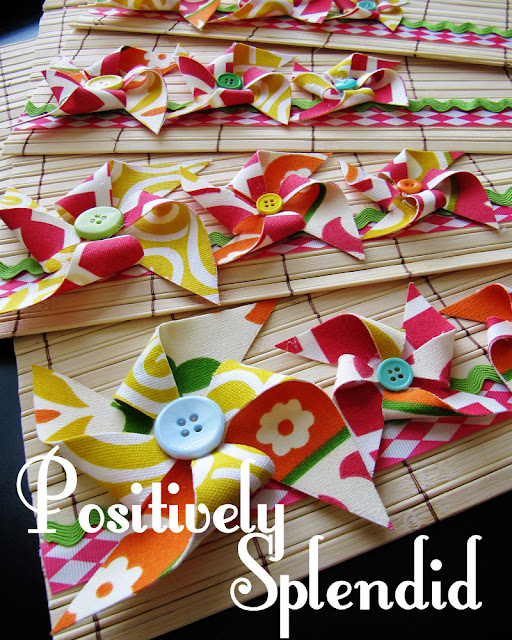
Today I’m going to share a quick project with you to punch up your table decor during your next outdoor gathering. These fun pinwheel placemats are a terrific project to complete with fabric scraps you might have lying around!

All set to see how these are made? Let’s get started!

For this project, you will need…

Fusible web, such as Wonder Under
Iron
Fabric scraps in various prints
Paper and paper trimmer
Disappearing ink marker
Clear ruler
Scissors
Hot glue gun and glue sticks
Buttons
Ribbon and/or rick-rack
Bamboo placemats (I found mine in the Dollar Spot at Target)

step 1 / Use your paper trimmer to make square templates of various sizes. I found that squares of 4″, 3″ and 2.5″ work well. Fuse contrasting pieces of your scrap fabric together, wrong sides facing, following the instructions for your fusible web. Use your disappearing ink marker to trace your square templates onto your fused fabric pieces, and cut your squares out. (You will need three squares of descending sizes for each placemat.) Using your ruler, draw lines diagonally through the center of your squares with your disappearing ink marker, as shown.

step 2 / Use your scissors to snip about 2/3 of length of the lines you just drew, as shown.
step 3 / Add a dab of hot glue to the center of each of your trimmed pieces. Fold every alternating corner of your snipped sections up to this center point, as shown, pressing them firmly into the hot glue to secure them.
step 4 / Add a button or other embellishment to the center of each pinwheel to conceal the glued corners. Cut strips of ribbon or rick-rack that are the width of your placemats and adhere these to the left side of your mat with hot glue. Hot glue three pinwheels of descending size, from largest to smallest, along this ribbon, as shown.
All finished!

Aren’t these little guys so festive and fun? 

Have a great week!

Photobucket

Linking this to…
Skip to My Lou
Home Stories A to Z
Tip Junkie
Today’s Creative Blog

Amy @ Positively Splendid

Having grown up in a home brimming with sewing notions and paintbrushes, Amy has a deep love for all things creative. On any given day, you’ll find her knee-deep in her latest creative endeavor, with projects ranging from sewing and crafts to home decor and kid-friendly ideas. Amy believes that everyone, regardless of skill level or experience, possesses the ability to create something beautiful, and Positively Splendid was born of her passion for helping others harness their innate creative potential.

EVEN MORE GREAT IDEAS JUST FOR YOU!

FacebookTweetPinYummlyPrint

Filed Under: Crafts, Home Decor Crafts, Home Decor Crafts, Mantels and Tablescapes, Positively Handmade, Quick and Easy Crafts, Summer, Tutorials Tagged With: Outdoor decor, Summer

Previous Post: « Petite Lemon Giveaway!
Next Post: A New Series: My Blogging Story »

Reader Interactions

Comments

  1. Jennifer @ Delightfully Noted says

    August 8, 2011 at 12:37 pm

    Oh my gosh these are too stinken cute! What nice summery way to dress up the table and I’m smitten with anyhing pinwheels. Great job.

  2. bev says

    August 8, 2011 at 3:19 pm

    These are just simply adorable and so easy to make. Thank you for sharing Amy. As always…you out did yourself with another great idea with a simplified tutorial.

  3. saraink says

    August 8, 2011 at 6:20 pm

    So adorable!!! This are so cute and fun, thank you so much for the great tutorial!

  4. Erin says

    August 8, 2011 at 6:57 pm

    Absolutely adorable!

  5. Amanda @ Serenity Now says

    August 8, 2011 at 7:06 pm

    Those are so fun, Amy! I love how colorful your projects are. So cheerful!

  6. Stephanie says

    August 8, 2011 at 9:40 pm

    Those are so cute! What a fun way to add color to those placemats!

  7. Christina says

    August 8, 2011 at 11:34 pm

    thats it….mad rush to make these for my daughters bday party tomorrow……

  8. Paige says

    August 9, 2011 at 2:32 am

    Super cute and festive.

  9. Kelli @ RTSM says

    August 9, 2011 at 4:42 pm

    Amy this is SUPER cute! I love the fabrics you used…the colors are perfect for summer!

  10. Kari says

    August 9, 2011 at 7:47 pm

    Such a fun way to spruce up those placemats-I totally have the same ones and didn’t even think of this. I used them for another project but this is great as well. I would love it if you linked this up to my weekly link party Tutorial Tuesday

    Kari
    Newlyweds on a Budget

  11. Leslie says

    August 17, 2011 at 1:58 am

    This is so incredibly adorable…I love it!

Primary Sidebar

PS Search

Search this website

Seasonal Inspiration

Hocus Pocus Wreath
Ghost Plushies
Paper Pumpkins
Fabric Yo-Yo Pumpkins

Copyright © 2025 · Positively Splendid · All Rights Reserved. · Privacy Policy

Privacy & Cookies: This site uses cookies and other tracking technologies to assist with navigation and your ability to provide feedback, analyse your use of our products and services, assist with our promotional and marketing efforts, and provide content from third parties. To find out more, as well as how to remove or block these, see here: Our Cookie/Privacy Policy